Ultimativer Leitfaden für einen performanten und sicheren Nextcloud Server mit Ubuntu
Dieser Blogbeitrag beschreibt, wie Sie Nextcloud für Online-Speicher auf einem Hetzner Dedicated Root Server oder einem Hetzner Cloud Server installieren und konfigurieren.
Bitte kontaktieren Sie uns
, wenn etwas nicht klar beschrieben ist, nicht funktioniert, falsch erscheint oder wenn Sie Unterstützung benötigen.
Dieser Blogbeitrag ist so konzipiert, dass er in kopierbaren Befehlen zeigt, wie man eine Nextcloud-Installation auf einem dedizierten Hetzner- oder Cloud-Server mit Ubuntu 22.04 LTS einrichtet, verwaltet und wartet. Dieser Blogbeitrag wurde für Leser mit geringen technischen Linux-Kenntnissen geschrieben und ermöglicht es Ihnen, einfach und schnell eine sichere und performante Nextcloud-Installation auf Ihrem eigenen kostengünstigen Server einzurichten.
Schauen wir uns zunächst die Ressourcenanforderungen für Nextcloud
an. Wie die Dokumentation besagt, hängen sowohl die CPU- als auch die RAM-Anforderungen für Server davon ab, wie viele Benutzer Sie gleichzeitig auf Ihrer neuen Nextcloud verwenden können sollen. Wenn Ihr Nextcloud-Server nicht genutzt wird, reicht jede Maschine mit zwei Kernen und 4 GB RAM problemlos aus.
Für etwa 20 gleichzeitige Benutzer würde Blunix mindestens vier CPU-Kerne und zwischen 16 GB und 24 GB RAM empfehlen. Für bis zu 50 etwas aktive Benutzer würden wir mindestens 8 Kerne und 64 GB RAM sowie schnellen Speicher empfehlen.
Denken Sie daran, dass Sie bei Hetzner Cloud Servern die gewählte Instanz jederzeit hochskalieren können, um zu sehen, was Ihren Anforderungen entspricht. Wenn Sie verschiedene Instanzgrößen ausprobieren, stellen Sie sicher, dass Sie die Root-Disk nicht vergrößern, damit Sie wieder herunterskalieren können:
Für das Schreiben dieses Blogbeitrags haben wir eine CCX23 Cloud-Instanz sowie einen ~30,00 € pro Monat teuren dedizierten Server aus den Hetzner-Serverauktionen gewählt. Beide Maschinen befanden sich in Falkenstein, Deutschland
und liefen mit Ubuntu Linux 22.04
.
Der von uns gewählte Cloud-Server verfügt über vier AMD-CPU-Kerne, 16 GB RAM, eine 160 GB Root-Disk. Enthalten sind 20 TB monatlicher Traffic (behalten Sie dies im Hinterkopf, wenn Sie planen, Multimedia-Dateien auf Ihrer Nextcloud zu speichern). All dies kostet 28,55 € pro Monat.
Wir werden eine Hetzner Storage Box
oder alternativ ein zusätzliches HCloud Volume
verwenden, um das Nextcloud-Datenverzeichnis zu speichern (dort speichert Nextcloud die Dateien, die Sie hochladen).
Der gebrauchte dedizierte Server verfügt über einen 3,4 GHz i7-6700, 32 GB RAM und zwei 512 GB SSDs für insgesamt 30,00 € pro Monat. Diese Server werden normalerweise mit sehr schnellen SSDs oder sehr großen Festplattenlaufwerken geliefert. Sie können auch eine Hetzner Storage Box auf einem dedizierten Server (neu oder aus der Auktion) verwenden.
Wenn Sie planen, einen gebrauchten dedizierten Root-Server aus der Auktion zu mieten, könnten Sie an den Hetzner-FAQs zu den Serverauktionen
interessiert sein.
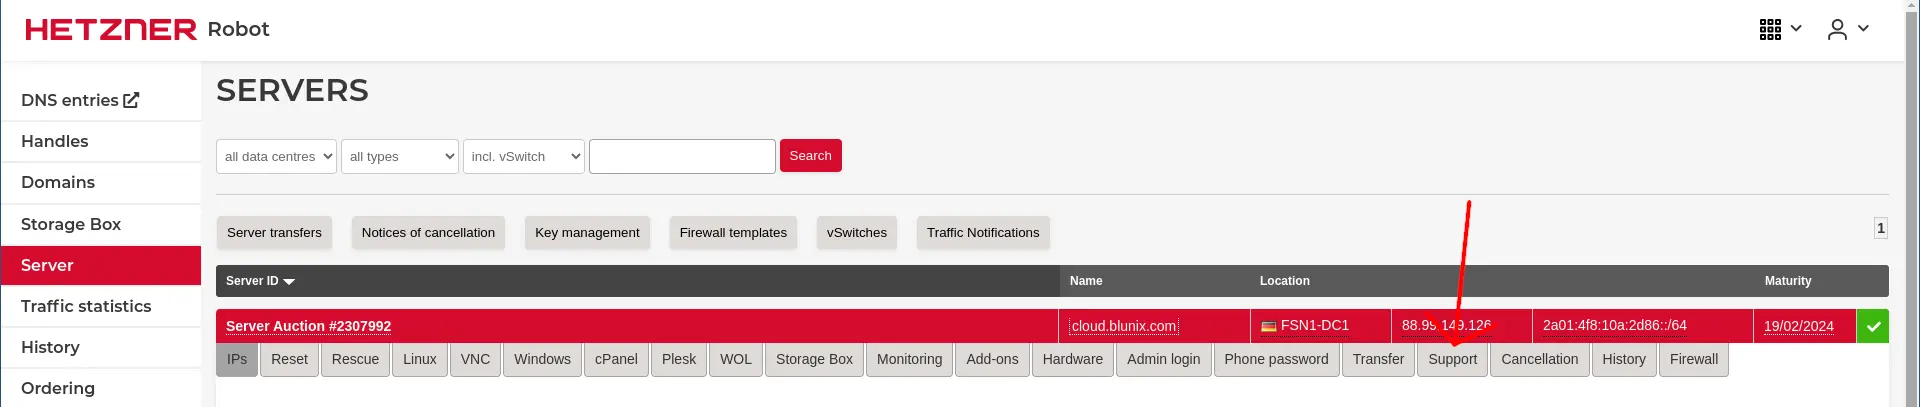
Wenn Sie einen dedizierten Root-Server oder einen gebrauchten aus den Serverauktionen gekauft haben, ist die Erstinstallation etwas komplexer. Beim ersten SSH-Login auf die IP-Adresse Ihres neuen Servers läuft der Server mit dem Hetzner Rescue Operating System
, einem Debian Linux-basierten Live-System, das Ihnen Zugriff auf die Festplatten des Servers ermöglicht. Die Installation eines Betriebssystems erfolgt mit dem von Hetzner bereitgestellten Skript installimage
.
Aktivieren Sie zunächst das Rescue-System:
Holen Sie sich dann die IP-Adresse des Servers von der Übersichtsseite:
Melden Sie sich mit SSH beim neuen Server an:
ssh root@88.99.149.126
The authenticity of host '88.99.149.126 (88.99.149.126)' can't be established.
ED25519 key fingerprint is SHA256:g1zfOtabKtYxd7mMYgDrroka88xaMxynHfgFXAa1K4E.
This key is not known by any other names
Are you sure you want to continue connecting (yes/no/[fingerprint])? yes
Warning: Permanently added '88.99.149.126' (ED25519) to the list of known hosts.
Linux rescue 6.7.4 #1 SMP Tue Feb  6 15:07:47 UTC 2024 x86_64

-------------------------------------------------------------------------------------------------------------------------

  Welcome to the Hetzner Rescue System.

  This Rescue System is based on Debian GNU/Linux 12 (bookworm) with a custom kernel.
  You can install software like you would in a normal system.

  To install a new operating system from one of our prebuilt images, run 'installimage' and follow the instructions.

  Important note: Any data that was not written to the disks will be lost during a reboot.

  For additional information, check the following resources:
    Rescue System:           https://docs.hetzner.com/robot/dedicated-server/troubleshooting/hetzner-rescue-system
    Installimage:            https://docs.hetzner.com/robot/dedicated-server/operating-systems/installimage
    Install custom software: https://docs.hetzner.com/robot/dedicated-server/operating-systems/installing-custom-images
    other articles:          https://docs.hetzner.com/robot

-------------------------------------------------------------------------------------------------------------------------

Rescue System (via Legacy/CSM) up since 2024-02-20 23:52 +01:00

Hardware data:

   CPU1: Intel(R) Core(TM) i7-6700 CPU @ 3.40GHz (Cores 8)
   Memory:  31891 MB
   Disk /dev/sda: 512 GB (=> 476 GiB) doesn't contain a valid partition table
   Disk /dev/sdb: 512 GB (=> 476 GiB) doesn't contain a valid partition table
   Total capacity 953 GiB with 2 Disks

Network data:
   eth0  LINK: yes
         MAC:  90:1b:0e:8f:c3:34
         IP:   88.99.149.126
         IPv6: 2a01:4f8:10a:2d86::2/64
         Intel(R) PRO/1000 Network Driver

root@rescue ~ #
Wir werden das von Hetzner bereitgestellte Skript installimage
verwenden, um Ubuntu 22.04 zu installieren. Dieses Skript benötigt eine Konfigurationsdatei. Zusätzliche Konfigurationsdateien finden Sie im Rescue-System unter “/root/configs/”.
Starten Sie die Installation mit der erstellten Konfigurationsdatei:
installimage -c myconfig.txt

Found AUTOSETUP file '/autosetup'
Running unattended installimage installation ...

DRIVE1 /dev/sda
DRIVE2 /dev/sdb
SWRAID 1
SWRAIDLEVEL 1
BOOTLOADER grub
HOTNAME cloud.blunix.com
PART /boot ext3 2G
PART lvm   vg0   all
LV vg0 root /    ext4  100G
LV vg0 swap swap swap   4G
IMAGE /root/images/Ubuntu-2204-jammy-amd64-base.tar.gz


ALL DATA ON THE GIVEN DISKS WILL BE DESTROYED!

DO YOU REALLY WANT TO CONTINUE? [y|N] y


WARNING:
  Starting installation in 20 seconds ...
  Press X to continue immediately ...
  Installation will DELETE ALL DATA ON DISK(s)!
  Press CTRL-C to abort now!
  => ....................

                Hetzner Online GmbH - installimage

  Your server will be installed now, this will take some minutes
             You can abort at any time with CTRL+C ...

         :  Reading configuration                           done
         :  Loading image file variables                    done
         :  Loading debian specific functions               done
   1/17  :  Deleting partitions                             done
   2/17  :  Test partition size                             done
   3/17  :  Creating partitions and /etc/fstab              done
   4/17  :  Creating software RAID level 1                  done
   5/17  :  Creating LVM volumes                            done
   6/17  :  Formatting partitions
         :    formatting /dev/md/0 with ext3                done
         :    formatting /dev/vg0/root with ext4            done
         :    formatting /dev/vg0/swap with swap            done
   7/17  :  Mounting partitions                             done
   8/17  :  Sync time via ntp                               done
         :  Importing public key for image validation       done
   9/17  :  Validating image before starting extraction     done
  10/17  :  Extracting image (local)                        done
  11/17  :  Setting up network config                       done
  12/17  :  Executing additional commands
         :    Setting hostname                              done
         :    Generating new SSH keys                       done
         :    Generating mdadm config                       done
         :    Generating ramdisk                            done
         :    Generating ntp config                         done
  13/17  :  Setting up miscellaneous files                  done
  14/17  :  Configuring authentication
         :    Fetching SSH keys                             done
         :    Disabling root password                       done
         :    Disabling SSH root login with password        done
         :    Copying SSH keys                              done
  15/17  :  Installing bootloader grub                      done
  16/17  :  Running some debian specific functions          done
  17/17  :  Clearing log files                              done

                  INSTALLATION COMPLETE
   You can now reboot and log in to your new system with the
 same credentials that you used to log into the rescue system.
Nachdem die Installation abgeschlossen ist, können Sie den Server neu starten:
shutdown -r now
Beim ersten Login wird Ihr SSH-Client über eine geänderte SSH-Remote-Host-Identifikation für die angegebene IP-Adresse beschweren. In diesem Fall ist dies normal und zu erwarten, da Sie zuvor den SSH-Hostschlüssel des Hetzner-Rescue-Betriebssystems akzeptiert haben und Ihre neue Ubuntu 22.04-Installation nun einen anderen SSH-Hostschlüssel hat. Sie können dies wie folgt beheben:
ssh root@88.99.149.126
@@@@@@@@@@@@@@@@@@@@@@@@@@@@@@@@@@@@@@@@@@@@@@@@@@@@@@@@@@@
@    WARNING: REMOTE HOST IDENTIFICATION HAS CHANGED!     @
@@@@@@@@@@@@@@@@@@@@@@@@@@@@@@@@@@@@@@@@@@@@@@@@@@@@@@@@@@@
IT IS POSSIBLE THAT SOMEONE IS DOING SOMETHING NASTY!
Someone could be eavesdropping on you right now (man-in-the-middle attack)!
It is also possible that a host key has just been changed.
The fingerprint for the ED25519 key sent by the remote host is
SHA256:GoKmmJd2P6TdZUSM+URBgHNkgP5r60tpHyKINRNzOgk.
Please contact your system administrator.
Add correct host key in /home/user/.ssh/known_hosts to get rid of this message.
Offending RSA key in /home/user/.ssh/known_hosts:1547
  remove with:
  ssh-keygen -f "/home/user/.ssh/known_hosts" -R "88.99.149.126"
Host key for 88.99.149.126 has changed and you have requested strict checking.
Host key verification failed.


ssh-keygen -f "/home/user/.ssh/known_hosts" -R "88.99.149.126"
# Host 88.99.149.126 found: line 1545
# Host 88.99.149.126 found: line 1546
# Host 88.99.149.126 found: line 1547
/home/user/.ssh/known_hosts updated.
Original contents retained as /home/user/.ssh/known_hosts.old


ssh root@88.99.149.126
The authenticity of host '88.99.149.126 (88.99.149.126)' can't be established.
ED25519 key fingerprint is SHA256:GoKmmJd2P6TdZUSM+URBgHNkgP5r60tpHyKINRNzOgk.
This key is not known by any other names
Are you sure you want to continue connecting (yes/no/[fingerprint])? yes
Warning: Permanently added '88.99.149.126' (ED25519) to the list of known hosts.
Linux cloud 6.1.0-13-amd64 #1 SMP PREEMPT_DYNAMIC Debian 6.1.55-1 (2023-09-29) x86_64

The programs included with the Debian GNU/Linux system are free software;
the exact distribution terms for each program are described in the
individual files in /usr/share/doc/*/copyright.

Debian GNU/Linux comes with ABSOLUTELY NO WARRANTY, to the extent
permitted by applicable law.
root@cloud.blunix.com ~ #
Für unsere SLA-Hosting
-Kunden haben wir eine große Sammlung von Diensten und Konfigurationen, die wir auf alle neuen Server anwenden. Diese sind im Blunix-Manual in den Abschnitten Provisioning
und Baseline Services
dokumentiert.
Für Ihre neue Nextcloud-Installation empfehlen wir, (mindestens) die folgenden grundlegenden Konfigurationen und Sicherheitsverbesserungen durchzuführen.
Stellen Sie sicher, dass Sie “Ja” auswählen, wenn Sie gefragt werden, ob Sicherheitsupdates automatisch installiert werden sollen:
Nach dem Upgrade des Systems auf den neuesten Stand wird empfohlen, den Server neu zu starten, um den neuesten installierten Kernel zu verwenden:
shutdown -r now
Wenn Sie eine “einmal installiert und nie wieder anfassen müssen”-Art von Installation bevorzugen, empfehlen wir Ihnen, auch automatische Neustarts bei Kernel-Upgrades zu aktivieren. Der folgende Konfigurationsblock plant diese für 2 Uhr morgens, vorausgesetzt, die automatischen Sicherheitsupdates haben eine neue Kernelversion installiert. Beachten Sie, dass bei unbeaufsichtigten Neustarts Dinge schief gehen können, aber bei einer stabilen Ubuntu-LTS-Version, die auf einem Hetzner Cloud- oder dedizierten Server läuft, würden wir dies für eher unwahrscheinlich halten.
So aktivieren Sie automatische Neustarts bei Kernel-Upgrades:
cat << EOF > /etc/apt/apt.conf.d/52unattended-upgrades-local
// Automatischer Neustart OHNE BESTÄTIGUNG, wenn
// die Datei /var/run/reboot-required nach dem Upgrade gefunden wird
Unattended-Upgrade::Automatic-Reboot "true";

// Automatischer Neustart, auch wenn Benutzer gerade angemeldet sind
// wenn Unattended-Upgrade::Automatic-Reboot auf true gesetzt ist
Unattended-Upgrade::Automatic-Reboot-WithUsers "true";

// Wenn der automatische Neustart aktiviert ist und benötigt wird, Neustart zu einer bestimmten
// Zeit anstatt sofort
// Standard: "now"
Unattended-Upgrade::Automatic-Reboot-Time "02:00";
EOF
Unattended Upgrades werden durch den systemd-Dienst “unattended-upgrades.service” ausgelöst, also starten wir diesen nach der Änderung seiner Konfiguration neu:
systemctl restart unattended-upgrades.service
systemctl status unattended-upgrades.service
● unattended-upgrades.service - Unattended Upgrades Shutdown
     Loaded: loaded (/lib/systemd/system/unattended-upgrades.service; enabled; vendor preset: enabled)
     Active: active (running) since Fri 2024-02-23 03:59:20 UTC; 5s ago
       Docs: man:unattended-upgrade(8)
   Main PID: 1275 (unattended-upgr)
      Tasks: 2 (limit: 38105)
     Memory: 8.2M
        CPU: 47ms
     CGroup: /system.slice/unattended-upgrades.service
             └─1275 /usr/bin/python3 /usr/share/unattended-upgrades/unattended-upgrade-shutdown --wait-for-signal

Feb 23 03:59:20 cloud systemd[1]: Started Unattended Upgrades Shutdown.
Wenn Sie jemals debuggen müssen, was während eines unbeaufsichtigten Upgrades oder Neustarts passiert ist, finden Sie hier die Logdatei-Speicherorte:
Ubuntu Linux ist standardmäßig einigermaßen sicher. Daher gibt es viele Dinge, die wir in SSH deaktivieren können, nur um später Verwirrung zu stiften, wenn jemand sie möglicherweise benötigt.
Einige Dinge sind jedoch in SSH aktiviert, die niemand jemals auf einem Nextcloud-Server benötigen wird und die in böswilliger Absicht verwendet werden könnten. Deaktivieren wir diese:
cat << "EOF" > /etc/ssh/sshd_config.d/99-custom.conf
# Passwörter sind veraltet zugunsten der SSH-Schlüsselpaar-Authentifizierung
PasswordAuthentication no
PermitEmptyPasswords no
PubkeyAuthentication yes

# Ändern Sie den Standard-SSH-Port, um 99% der automatisierten Angriffe loszuwerden
Port 2222

# Wir melden uns sowieso nur als root an (aus Bequemlichkeit), also können wir auch alle anderen verbieten
AllowUsers root
AllowGroups root

# Verbindung nach 5 Minuten Inaktivität trennen, um das Risiko von Terminal-Hijacking zu verringern
ClientAliveInterval 300
ClientAliveCountMax 0

# Auf einem Nextcloud-Server gibt es keine X-Server (grafische Systeme)
X11Forwarding no
EOF
Überprüfen Sie, ob die Syntax gültig ist:
sshd -t; echo $?
Und starten Sie dann den SSH-Daemon neu:
systemctl restart sshd.service
systemctl status sshd.service
● ssh.service - OpenBSD Secure Shell server
     Loaded: loaded (/lib/systemd/system/ssh.service; enabled; vendor preset: enabled)
     Active: active (running) since Fri 2024-02-23 04:01:43 UTC; 3s ago
       Docs: man:sshd(8)
             man:sshd_config(5)
    Process: 1290 ExecStartPre=/usr/sbin/sshd -t (code=exited, status=0/SUCCESS)
   Main PID: 1291 (sshd)
      Tasks: 1 (limit: 38105)
     Memory: 1.7M
        CPU: 18ms
     CGroup: /system.slice/ssh.service
             └─1291 "sshd: /usr/sbin/sshd -D [listener] 0 of 10-100 startups"

Feb 23 04:01:43 cloud systemd[1]: Starting OpenBSD Secure Shell server...
Feb 23 04:01:43 cloud sshd[1291]: Server listening on 0.0.0.0 port 2222.
Feb 23 04:01:43 cloud sshd[1291]: Server listening on :: port 2222.
Feb 23 04:01:43 cloud systemd[1]: Started OpenBSD Secure Shell server.
Melden Sie sich von Ihrer aktuellen Terminalsitzung ab und versuchen Sie, sich erneut anzumelden. Sie erhalten eine “Verbindung abgelehnt”-Meldung, da wir den SSH-Server-Port auf 2222 gesetzt haben. Wenn Sie bereits die Shorewall-Firewall installiert haben (siehe unten beschrieben), erhalten Sie nur ein Timeout.
ssh root@5.75.149.214
ssh: connect to host 5.75.149.214 port 22: Connection refused
Übergeben Sie das Argument -p an Ihren SSH-Client-Befehl, um den neuen Port anzugeben und sich anzumelden:
Nach dem Neustart eines dedizierten Servers erhalten Sie möglicherweise etwa eine Minute lang eine Verbindungsablehnung. Dedizierte Server booten etwas langsamer als Cloud-Server.
fail2ban
ist eine Log-Parsing-Anwendung, die Systemprotokolle auf Symptome eines automatisierten Angriffs auf Ihren Server überwacht. Wenn es zu viele fehlgeschlagene Login-Versuche, Anfragen oder andere offensichtlich böswillige Zeichenketten in Anwendungslogdateien innerhalb kurzer Zeit von derselben IP-Adresse erkennt, wird es diese IP mit iptables sperren. So installieren Sie fail2ban:
apt install fail2ban
Wir werden den Webserver Nginx
verwenden, um unsere Nextcloud mit PHP-FPM
zu hosten. fail2ban verwendet “Jails”, um zu definieren, welche Dienste überwacht werden und wie. Erstellen Sie eine neue Jail-Custom-Konfiguration für die Anwendungen, die wir überwachen möchten, im Verzeichnis /etc/fail2ban/jail.d/:
Beachten Sie, dass wir am Ende der Datei angegeben haben, dass SSH auf Port 2222 lauscht, damit fail2ban eine IP für Port 2222 sperrt, wenn es eine IP sperrt.
Fail2ban verwendet Filter, um Regexe zu definieren, die es gegen die in der obigen Jail-Konfiguration definierten Logdateien ausführt. Erstellen Sie ein benutzerdefiniertes Nextcloud-Filterskript, wie in der Nextcloud-Dokumentation gezeigt
:
Beim Neustart von fail2ban wird es sich beschweren, dass es noch keine Nginx- und keine Nextcloud-Logdatei gibt. Das ist in Ordnung, wir können den systemd-Dienst einfach aktivieren, damit er beim Booten startet und fail2ban nach der Installation von Nginx und Nextcloud tatsächlich starten.
systemctl enable fail2ban.service
systemctl restart fail2ban.service
systemctl status fail2ban.service
× fail2ban.service - Fail2Ban Service
     Loaded: loaded (/lib/systemd/system/fail2ban.service; enabled; vendor preset: enabled)
     Active: failed (Result: exit-code) since Thu 2024-02-22 04:08:38 UTC; 1s ago
       Docs: man:fail2ban(1)
    Process: 1974 ExecStart=/usr/bin/fail2ban-server -xf start (code=exited, status=255/EXCEPTION)
   Main PID: 1974 (code=exited, status=255/EXCEPTION)
        CPU: 74ms

Feb 22 04:08:38 cloud systemd[1]: Started Fail2Ban Service.
Feb 22 04:08:38 cloud fail2ban-server[1974]: 2024-02-22 04:08:38,448 fail2ban                [1974]: ERROR   Failed during configuration: Have not found any log file for nextcloud jail
Feb 22 04:08:38 cloud fail2ban-server[1974]: 2024-02-22 04:08:38,448 fail2ban                [1974]: ERROR   Async configuration of server failed
Feb 22 04:08:38 cloud systemd[1]: fail2ban.service: Main process exited, code=exited, status=255/EXCEPTION
Feb 22 04:08:38 cloud systemd[1]: fail2ban.service: Failed with result 'exit-code'.
Da fail2ban nicht startet, bis wir Nginx und Nextcloud installiert haben, schalten wir es vorerst aus:
Der haveged (HArdware Volatile Entropy Gathering and Expansion Daemon) bietet eine Entropiequelle für Linux-Systeme, um den Entropie-Pool zu füllen und die Fähigkeit des Systems zu verbessern, Zufallszahlen zu generieren. Entropie ist entscheidend für verschiedene kryptografische Operationen wie das Generieren sicherer SSL-Zertifikate, das Verschlüsseln von Daten und das Erstellen sicherer SSH-Schlüssel. In Linux-Systemen wird Entropie aus Hardware-Interaktionen wie Mausbewegungen und Tastatureingaben gesammelt, die in Headless- oder virtualisierten Umgebungen begrenzt sein können, was zu potenziellen Verlangsamungen bei Operationen führt, die qualitativ hochwertige Zufälligkeit erfordern.
So installieren und konfigurieren Sie haveged für Ihren neuen Nextcloud-Server:
apt install haveged
Haveged hat einen write_wakeup_threshold (in Bits). Wenn dieser gefüllt ist, wird haveged inaktiv, bis der Schwellenwert wieder erreicht ist. Standardmäßig ist dies 1024, was unserer Erfahrung nach etwas niedrig ist. Erhöhen wir es auf das Dreifache:
cat << EOF > /etc/default/haveged
# Configuration file for haveged

# Options to pass to haveged:
#DAEMON_ARGS="--write 3072"
EOF
Nach Änderungen an der Konfigurationsdatei müssen wir den Dienst neu starten:
systemctl restart haveged.service
systemctl status haveged.service
● haveged.service - Entropy Daemon based on the HAVEGE algorithm
     Loaded: loaded (/lib/systemd/system/haveged.service; enabled; vendor preset: enabled)
     Active: active (running) since Fri 2024-02-23 04:10:58 UTC; 2s ago
       Docs: man:haveged(8)
             http://www.issihosts.com/haveged/
   Main PID: 1798 (haveged)
      Tasks: 1 (limit: 38105)
     Memory: 3.5M
        CPU: 169ms
     CGroup: /system.slice/haveged.service
             └─1798 /usr/sbin/haveged --Foreground --verbose=1

Feb 23 04:10:58 cloud systemd[1]: Stopping Entropy Daemon based on the HAVEGE algorithm...
Feb 23 04:10:58 cloud systemd[1]: haveged.service: Deactivated successfully.
Feb 23 04:10:58 cloud systemd[1]: Stopped Entropy Daemon based on the HAVEGE algorithm.
Feb 23 04:10:58 cloud systemd[1]: Started Entropy Daemon based on the HAVEGE algorithm.
Feb 23 04:10:58 cloud haveged[1798]: haveged: command socket is listening at fd 3
Feb 23 04:10:58 cloud haveged[1798]: haveged starting up
Feb 23 04:10:59 cloud haveged[1798]: haveged: ver: 1.9.14; arch: x86; vend: GenuineIntel; build: (gcc 11.2.0 ITV); collect: 128K
Feb 23 04:10:59 cloud haveged[1798]: haveged: cpu: (L4 VC); data: 32K (L4 V); inst: 32K (L4 V); idx: 23/40; sz: 31288/55167
Feb 23 04:10:59 cloud haveged[1798]: haveged: tot tests(BA8): A:1/1 B:1/1 continuous tests(B):  last entropy estimate 7.9953
Feb 23 04:10:59 cloud haveged[1798]: haveged: fills: 0, generated: 0
Ein Tool, das wir nicht genug empfehlen können, ist atop
. Es ist im Wesentlichen ein Top-ähnlicher Monitor, der alle Ausgaben, die Sie in einem regulären “top”-Monitor sehen können, alle $interval Sekunden speichert. Dies ermöglicht es Ihnen zu überprüfen, welche Prozesse vor ein paar Stunden oder Tagen Performance-Probleme auf dem Server verursacht haben. Dies ist das empfohlene Mindestmaß an Überwachung, wenn Sie kein ausgeklügeltes Überwachungssystem wie Prometheus
haben (was Blunix-Kunden in der Produktion verwenden).
Atop ist besonders nützlich, wenn Ihre Kollegen und Entwickler sich beschweren, dass Owncloud vor drei Stunden langsam war und Sie analysieren möchten, welche Prozesse hohe Last verursacht haben, um abzuschätzen, wie stark Sie die Cloud-Instanz hochskalieren müssen.
Sie können atop wie folgt installieren:
apt install atop
Das Standard-Protokollintervall für atop beträgt 5 Minuten, was etwas hoch erscheint. Wir bevorzugen es, den Status alle 30 Sekunden zu speichern:
sed -i 's/^LOGINTERVAL.*/LOGINTERVAL=30/g' /etc/default/atop
systemctl restart atop.service
systemctl status atop.service
● atop.service - Atop advanced performance monitor
     Loaded: loaded (/lib/systemd/system/atop.service; enabled; vendor preset: enabled)
     Active: active (running) since Thu 2024-02-22 04:13:37 UTC; 2s ago
       Docs: man:atop(1)
    Process: 2505 ExecStartPre=/bin/sh -c test -n "$LOGINTERVAL" -a "$LOGINTERVAL" -eq "$LOGINTERVAL" (code=exited, status=0/SUCCESS)
    Process: 2506 ExecStartPre=/bin/sh -c test -n "$LOGGENERATIONS" -a "$LOGGENERATIONS" -eq "$LOGGENERATIONS" (code=exited, status=0/SUCCESS)
    Process: 2508 ExecStartPost=/usr/bin/find ${LOGPATH} -name atop_* -mtime +${LOGGENERATIONS} -exec rm -v {} ; (code=exited, status=0/SUCCESS)
   Main PID: 2507 (atop)
      Tasks: 1 (limit: 38105)
     Memory: 5.6M
        CPU: 73ms
     CGroup: /system.slice/atop.service
             └─2507 /usr/bin/atop -R -w /var/log/atop/atop_20240222 30

Feb 22 04:13:37 cloud systemd[1]: Starting Atop advanced performance monitor...
Feb 22 04:13:37 cloud systemd[1]: Started Atop advanced performance monitor.
atop ist standardmäßig auf allen von Blunix verwalteten Servern installiert. Hilfreiche Verwendungsbeispiele sind im Blunix-Manual
dokumentiert.
Für unerfahrene Benutzer empfehlen wir die Verwendung der Hetzner-Firewall für dedizierte Server
oder, wenn Sie einen hcloud-Server betreiben, der Hetzner-Firewall für Cloud-Server
. Sie ist sehr einfach und intuitiv zu konfigurieren. In ihrer einfachsten Konfiguration sollte sie so aussehen (stellen Sie sicher, dass Sie Port 2222 für SSH wählen, wenn Sie der obigen SSH-Server-Hardening-Konfiguration gefolgt sind).
Hetzner bietet die Konfiguration einer ausgehenden Firewall an. In einer Produktionsumgebung, die mit Blunix gehostet wird
, sind ausgehende Firewalls so konfiguriert, dass sie alle von ihr blockierten Pakete überwachen und protokollieren, als eines von vielen Mitteln zur Intrusion Detection. Wenn Sie für eine Agentur mit 10-50 Mitarbeitern arbeiten, könnte diese Art von Setup mehr als erforderlich sein und die Dinge unnötig verkomplizieren.
Wir haben eine vereinfachte Version von Shorewall
vorbereitet. Da wir nicht wissen, welche Überwachungs-, Backup-, zentrale Logdatei- und andere Systeme Sie verwenden, kann diese Konfiguration in diesem Blogbeitrag nicht vollständig sein. Sie müssen sie an Ihre Bedürfnisse anpassen. Die unten gezeigten Beispiele geben Ihnen eine voll funktionsfähige und angemessen gesicherte Nextcloud.
Bitte lesen Sie alle Konfigurationsdateien sorgfältig durch und passen Sie sie an Ihre Bedürfnisse an. Das apt-Paket shorewall bietet eine Firewall für IPv4-Verkehr mit Konfiguration in “/etc/shorewall/”, während das apt-Paket shorewall6 eine Firewall für IPv6-Verkehr mit Konfiguration in “/etc/shorewall6/” bietet.
apt install shorewall shorewall6
Seien Sie bei dedizierten Servern hier vorsichtig, ihre NICs werden manchmal “enp0s31f6” oder ähnlich statt “eth0” genannt. Beziehen Sie sich auch auf die Shorewall Interfaces-Dokumentation
.
Wir konfigurieren shorewall so, dass es einfach alle nicht ausdrücklich erlaubten (wie in den unten definierten Regeldateien) Verbindungsversuche aus dem öffentlichen Internet verwirft. Nicht speziell erlaubte Verbindungsversuche vom Server zum öffentlichen Internet werden abgelehnt und protokolliert. Bitte beziehen Sie sich auf die Shorewall Policy-Dokumentation
für weitere Informationen.
cat << EOF > /etc/shorewall/policy
#SOURCE		DEST		POLICY		LOG LEVEL	LIMIT:BURST
pub   all   DROP
all   all   REJECT   info
EOF
cat << EOF > /etc/shorewall6/policy
###############################################################################
#SOURCE         DEST            POLICY          LOG LEVEL       LIMIT:BURST
pub   all   DROP
all   all   REJECT   info
EOF
cat << EOF > /etc/shorewall/zones
#ZONE	TYPE	OPTIONS			IN		OUT
local   firewall
pub   ipv4
EOF
cat << EOF > /etc/shorewall6/zones
###############################################################################
#ZONE   TYPE    OPTIONS                 IN                      OUT
#                                       OPTIONS                 OPTIONS
local   firewall
pub   ipv6
EOF
Lesen und passen Sie diese Datei besonders sorgfältig an! Beziehen Sie sich auch auf die Shorewall-Dokumentation zu Regeln
. Sie sollten DNS, NTP, SMTP und andere Dienste auf die spezifischen Server eingrenzen, die Sie auf Ihrem Server konfiguriert haben, und die Kommunikation mit Ihren Backup-, Überwachungs-, zentralen Logdatei- und möglicherweise anderen Systemen erlauben.
cat << EOF > /etc/shorewall/rules
#AKTION		QUELLE		ZIEL		PROTO	ZIEL		QUELL		ORIGINAL	RATE		BENUTZER/	MARKIERUNG	VERBINDUNGSLIMIT	ZEIT		KOPFZEILEN		SCHALTER		HELFER
#			PORT	PORT(S)		ZIEL		LIMIT		GRUPPE
?SECTION NEW

# Eingehendes SSH auf Port 2222 erlauben
ACCEPT pub local tcp 2222

# Eingehendes SSH auf Port 22 erlauben
#SSH(ACCEPT) pub local - -

# Eingehendes SSH von bestimmten IPs erlauben
#ACCEPT pub:3.3.3.3,4.4.4.4 local tcp 2222

# Eingehende ICMP-Echo-Anfrage/-Antwort erlauben
Ping(ACCEPT) pub local icmp -

# Ausgehende ICMP-Echo-Anfrage/-Antwort erlauben
Ping(ACCEPT) local pub icmp -

# Ausgehende DNS-Abfragen erlauben
DNS(ACCEPT) local pub - -

# Ausgehende NTP-Abfragen erlauben
NTP(ACCEPT) local pub - -

# Ausgehendes SMTP erlauben
ACCEPT local pub tcp 25,465,587

# HKP (GPG Public Key Server) erlauben
HKP(ACCEPT) local pub - -

# Wichtige ICMP (Routen-Aushandlung und Zeitüberschreitung) erlauben
AllowICMPs(ACCEPT) local all - -

# Ausgehendes Git erlauben
Git(ACCEPT) local pub - -

# Ausgehendes HTTP und HTTPS erlauben
Web(ACCEPT) local pub - -

# Ausgehendes SSHFS zur Hetzner Storagebox auf Port 23 erlauben
#ACCEPT local pub:u123456789.your-storagebox.de tcp 23

# Eingehendes HTTP und HTTPS für Nextcloud erlauben
Web(ACCEPT) pub local - -
EOF
cat << EOF > /etc/shorewall6/rules
######################################################################################################################################################################################################
#ACTION         SOURCE          DEST            PROTO   DEST    SOURCE          ORIGINAL        RATE            USER/   MARK    CONNLIMIT       TIME            HEADERS         SWITCH          HELPER
#                                                       PORT    PORT(S)         DEST            LIMIT           GROUP
?SECTION NEW
# Ausgehendes HTTP und HTTPS erlauben
Web(ACCEPT) local pub - -

# Wichtige ICMP (Routen-Aushandlung und Zeitüberschreitung) erlauben
AllowICMPs(ACCEPT) local all - -

# Ausgehende NTP-Abfragen erlauben
NTP(ACCEPT) local pub - -
EOF
Verwenden Sie den Befehl “shorewall check”, um Ihre neue Konfiguration zu überprüfen, bevor Sie versuchen, die Firewall neu zu starten:
shorewall6 check
Checking using Shorewall 5.2.3.4...
Processing /etc/shorewall6/params ...
Processing /etc/shorewall6/shorewall6.conf...
Loading Modules...
Checking /etc/shorewall6/zones...
Checking /etc/shorewall6/interfaces...
Determining Hosts in Zones...
Locating Action Files...
Checking /etc/shorewall6/policy...
Adding Anti-smurf Rules
Adding rules for DHCP
Checking TCP Flags filtering...
Checking MAC Filtration -- Phase 1...
Checking /etc/shorewall6/rules...
Checking /usr/share/shorewall/action.AllowICMPs for chain AllowICMPs...
Checking /etc/shorewall6/conntrack...
Checking MAC Filtration -- Phase 2...
Applying Policies...
Checking /usr/share/shorewall/action.AllowICMPs for chain %AllowICMPs...
Checking /usr/share/shorewall/action.Broadcast for chain Broadcast...
Checking /usr/share/shorewall/action.Multicast for chain Multicast...
Shorewall6 configuration verified
Wenn Sie nicht zu 100% sicher sind, dass die von Ihnen konfigurierte Firewall Sie nicht vom Server aussperrt, können Sie die Firewall in einer tmux-Shell
starten. Diese Shell wird nicht geschlossen und führt Befehle weiterhin aus, selbst wenn Ihre Verbindung unterbrochen wird.
apt install tmux
tmux
Sie können feststellen, dass Sie sich in der tmux-Shell befinden, wenn Ihre Shell am unteren Rand des Terminals eine grüne Statusleiste anzeigt:
Führen Sie die folgenden Befehle innerhalb der tmux aus. Sie wird shorewall und shorewall6 neu starten, und wenn Sie sich ausgesperrt haben, werden nach 20 Sekunden alle Firewall-Regeln gelöscht.
Wenn Ihre Shell nach dem Ausführen dieser Befehle noch funktioniert, drücken Sie einfach STRG + C, um den Sleep-Befehl abzubrechen.
Sie können die tmux-Shell verlassen, indem Sie “exit” eingeben.
Wenn Sie sicher sind, dass alles korrekt konfiguriert ist, stoppen Sie shorewall manuell. Wir werden den systemd-Dienst verwenden, um shorewall wieder zu starten, was es auch beim Booten startet:
shorewall clear
shorewall6 clear
systemctl enable shorewall6.service
systemctl enable shorewall.service
Synchronizing state of shorewall.service with SysV service script with /lib/systemd/systemd-sysv-install.
Executing: /lib/systemd/systemd-sysv-install enable shorewall
Created symlink /etc/systemd/system/basic.target.wants/shorewall.service → /lib/systemd/system/shorewall.service.

systemctl start shorewall6.service
systemctl start shorewall.service

systemctl status shorewall6.service
systemctl status shorewall.service
● shorewall.service - Shorewall IPv4 firewall
     Loaded: loaded (/lib/systemd/system/shorewall.service; disabled; vendor preset: enabled)
     Active: active (exited) since Wed 2024-02-21 17:23:30 UTC; 4s ago
    Process: 1650 ExecStart=/sbin/shorewall $OPTIONS start $STARTOPTIONS (code=exited, status=0/SUCCESS)
   Main PID: 1650 (code=exited, status=0/SUCCESS)
        CPU: 148ms

Feb 21 17:23:29 blu-tool-prod-nc-1 systemd[1]: Starting Shorewall IPv4 firewall...
Feb 21 17:23:29 blu-tool-prod-nc-1 shorewall[1677]: Starting Shorewall....
Feb 21 17:23:29 blu-tool-prod-nc-1 shorewall[1677]: Initializing...
Feb 21 17:23:30 blu-tool-prod-nc-1 shorewall[1677]: Setting up Route Filtering...
Feb 21 17:23:30 blu-tool-prod-nc-1 shorewall[1677]: Setting up Martian Logging...
Feb 21 17:23:30 blu-tool-prod-nc-1 shorewall[1677]: Preparing iptables-restore input...
Feb 21 17:23:30 blu-tool-prod-nc-1 shorewall[1677]: Running /sbin/iptables-restore --wait 60...
Feb 21 17:23:30 blu-tool-prod-nc-1 shorewall[1677]: done.
Feb 21 17:23:30 blu-tool-prod-nc-1 systemd[1]: Finished Shorewall IPv4 firewall.
Fehlgeschlagene Verbindungsversuche ins öffentliche Internet werden nun abgelehnt und in “/var/log/syslog” protokolliert. Sie können dies zur Fehlerbehebung Ihrer Firewall verwenden, wenn Sie zusätzliche Dienste wie Backups, Überwachung, zentrale Logdateien usw. anschließen.
Now that our server is reasonably secure its time to install all services that Nextcloud needs. We will need Nginx with Letsencrypt for TLS, MariaDB, Redis and PHP-FPM.
We need SSL certificates to offer encrypted HTTPS traffic with our webserver Nginx. Here is how to generate them. Note that we give certbot a fake email address (we are a bit privacy focused). If you give it a real email address, it will send you mail when your certificate is about to expire.
apt install certbot
certbot certonly --standalone --domain cloud.blunix.com
Saving debug log to /var/log/letsencrypt/letsencrypt.log
Enter email address (used for urgent renewal and security notices)
 (Enter 'c' to cancel): privacy-first@none-of-your-business.com

- - - - - - - - - - - - - - - - - - - - - - - - - - - - - - - - - - - - - - - -
Please read the Terms of Service at
https://letsencrypt.org/documents/LE-SA-v1.3-September-21-2022.pdf. You must
agree in order to register with the ACME server. Do you agree?
- - - - - - - - - - - - - - - - - - - - - - - - - - - - - - - - - - - - - - - -
(Y)es/(N)o: Y

- - - - - - - - - - - - - - - - - - - - - - - - - - - - - - - - - - - - - - - -
Would you be willing, once your first certificate is successfully issued, to
share your email address with the Electronic Frontier Foundation, a founding
partner of the Let's Encrypt project and the non-profit organization that
develops Certbot? We'd like to send you email about our work encrypting the web,
EFF news, campaigns, and ways to support digital freedom.
- - - - - - - - - - - - - - - - - - - - - - - - - - - - - - - - - - - - - - - -
(Y)es/(N)o: N
Account registered.
Requesting a certificate for cloud.blunix.com

Successfully received certificate.
Certificate is saved at: /etc/letsencrypt/live/cloud.blunix.com/fullchain.pem
Key is saved at:         /etc/letsencrypt/live/cloud.blunix.com/privkey.pem
This certificate expires on 2024-05-14.
These files will be updated when the certificate renews.

NEXT STEPS:
- The certificate will need to be renewed before it expires. Certbot can automatically renew the certificate in the background, but you may need to take steps to enable that functionality. See https://certbot.org/renewal-setup for instructions.

- - - - - - - - - - - - - - - - - - - - - - - - - - - - - - - - - - - - - - - -
If you like Certbot, please consider supporting our work by:
 * Donating to ISRG / Let's Encrypt:   https://letsencrypt.org/donate
 * Donating to EFF:                    https://eff.org/donate-le
- - - - - - - - - - - - - - - - - - - - - - - - - - - - - - - - - - - - - - - -
We chose Nginx to host nextcloud as its easy to configure as well as offering great performance.
Keep in mind that when hosting nextcloud for an agency with around 20-50 employees, nginx versus apache2 versus traeffic versus anything else is completely irrelevant. Webservers show their differences in performance in much, MUCH larger hosting scenarios only.
apt install nginx
Nginx comes with an exemplary default vhost, which can be deleted:
rm /etc/nginx/sites-enabled/default
Here is a Nginx vhost config for Nextcloud, optimized for performance and security. Replace cloud.blunix.com with your desired domain and save the file to “/etc/nginx/sites-available/nextcloud.conf”.
editor /etc/nginx/sites-available/nextcloud.conf
server {
    listen 80;
    server_name _;
    return 301 https://cloud.blunix.com$request_uri;
    error_log /var/log/nginx/error.log;
    access_log /dev/null;
}

upstream php-handler {
    server unix:/var/run/php/nextcloud.sock;
}

server {
    listen 443      ssl http2;
    listen [::]:443 ssl http2;
    server_name cloud.blunix.com;

    # Use Mozilla's guidelines for SSL/TLS settings https://mozilla.github.io/server-side-tls/ssl-config-generator/
    ssl_certificate     /etc/letsencrypt/live/cloud.blunix.com/fullchain.pem;
    ssl_certificate_key /etc/letsencrypt/live/cloud.blunix.com/privkey.pem;
    add_header Strict-Transport-Security "max-age=15552000; includeSubDomains; preload;" always;
    client_max_body_size 512M;
    client_body_timeout 300s;
    fastcgi_buffers 64 4K;

    # Enable gzip but do not remove ETag headers
    gzip on;
    gzip_vary on;
    gzip_comp_level 4;
    gzip_min_length 256;
    gzip_proxied expired no-cache no-store private no_last_modified no_etag auth;
    gzip_types application/atom+xml application/javascript application/json application/ld+json application/manifest+json application/rss+xml application/vnd.geo+json application/vnd.ms-fontobject application/wasm application/x-font-ttf application/x-web-app-manifest+json application/xhtml+xml application/xml font/opentype image/bmp image/svg+xml image/x-icon text/cache-manifest text/css text/plain text/vcard text/vnd.rim.location.xloc text/vtt text/x-component text/x-cross-domain-policy;

    # Pagespeed is not supported by Nextcloud, so if your server is built
    # with the `ngx_pagespeed` module, uncomment this line to disable it
    #pagespeed off;

    # HTTP response headers borrowed from Nextcloud `.htaccess`
    add_header Referrer-Policy                      "no-referrer"   always;
    add_header X-Content-Type-Options               "nosniff"       always;
    add_header X-Download-Options                   "noopen"        always;
    add_header X-Frame-Options                      "SAMEORIGIN"    always;
    add_header X-Permitted-Cross-Domain-Policies    "none"          always;
    add_header X-Robots-Tag                         "noindex, nofollow" always;
    add_header X-XSS-Protection                     "1; mode=block" always;

    # Remove X-Powered-By, which is an information leak
    fastcgi_hide_header X-Powered-By;

    # Path to the root of your installation
    root /var/www/nextcloud/nextcloud;

    # Specify how to handle directories -- specifying `/index.php$request_uri`
    # here as the fallback means that Nginx always exhibits the desired behaviour
    # when a client requests a path that corresponds to a directory that exists
    # on the server. In particular, if that directory contains an index.php file,
    # that file is correctly served; if it doesn't, then the request is passed to
    # the front-end controller. This consistent behaviour means that we don't need
    # to specify custom rules for certain paths (e.g. images and other assets,
    # `/updater`, `/ocm-provider`, `/ocs-provider`), and thus
    # `try_files $uri $uri/ /index.php$request_uri`
    # always provides the desired behaviour.
    index index.php index.html /index.php$request_uri;

    # Rule borrowed from `.htaccess` to handle Microsoft DAV clients
    location = / {
        if ( $http_user_agent ~ ^DavClnt ) {
            return 302 /remote.php/webdav/$is_args$args;
        }
    }

    location = /robots.txt {
        allow all;
        log_not_found off;
        access_log off;
    }

    # Make a regex exception for `/.well-known` so that clients can still
    # access it despite the existence of the regex rule
    # `location ~ /(\.|autotest|...)` which would otherwise handle requests
    # for `/.well-known`.
    location ^~ /.well-known {
        # The rules in this block are an adaptation of the rules
        # in `.htaccess` that concern `/.well-known`.

        location = /.well-known/carddav { return 301 /remote.php/dav/; }
        location = /.well-known/caldav  { return 301 /remote.php/dav/; }

        location /.well-known/acme-challenge    { try_files $uri $uri/ =404; }
        location /.well-known/pki-validation    { try_files $uri $uri/ =404; }

        # Let Nextcloud's API for `/.well-known` URIs handle all other
        # requests by passing them to the front-end controller.
        return 301 /index.php$request_uri;
    }

    # Rules borrowed from `.htaccess` to hide certain paths from clients
    location ~ ^/(?:build|tests|config|lib|3rdparty|templates|data)(?:$|/)  { return 404; }
    location ~ ^/(?:\.|autotest|occ|issue|indie|db_|console)                { return 404; }

    # Ensure this block, which passes PHP files to the PHP process, is above the blocks
    # which handle static assets (as seen below). If this block is not declared first,
    # then Nginx will encounter an infinite rewriting loop when it prepends `/index.php`
    # to the URI, resulting in a HTTP 500 error response.
    location ~ \.php(?:$|/) {
        # Required for legacy support
        rewrite ^/(?!index|remote|public|cron|core/ajax/update|status|ocs/v[12]|updater/.+|oc[ms]-provider/.+|.+\/richdocumentscode\/proxy) /index.php$request_uri;

        fastcgi_split_path_info ^(.+?\.php)(/.*)$;
        set $path_info $fastcgi_path_info;

        try_files $fastcgi_script_name =404;

        include fastcgi_params;
        fastcgi_param SCRIPT_FILENAME $document_root$fastcgi_script_name;
        fastcgi_param PATH_INFO $path_info;
        fastcgi_param HTTPS on;

        fastcgi_param modHeadersAvailable true;         # Avoid sending the security headers twice
        fastcgi_param front_controller_active true;     # Enable pretty urls
        fastcgi_pass php-handler;

        fastcgi_intercept_errors on;
        fastcgi_request_buffering off;

        fastcgi_read_timeout 300;
        fastcgi_max_temp_file_size 0;
    }

    location ~ \.(?:css|js|svg|gif|png|jpg|ico|wasm|tflite|map|ogg|flac|mjs)$ {
        try_files $uri /index.php$request_uri;
        expires 6M;         # Cache-Control policy borrowed from `.htaccess`
        access_log off;     # Optional: Don't log access to assets

        location ~ \.wasm$ {
            default_type application/wasm;
        }
    }

    location ~ \.woff2?$ {
        try_files $uri /index.php$request_uri;
        expires 7d;         # Cache-Control policy borrowed from `.htaccess`
        access_log off;     # Optional: Don't log access to assets
    }

    # Rule borrowed from `.htaccess`
    location /remote {
        return 301 /remote.php$request_uri;
    }

    location / {
        try_files $uri $uri/ /index.php$request_uri;
    }
}
Add mjs to mime.types to prevent the Nextcloud error “Could not check for JavaScript support. Please check manually if your webserver serves .mjs files using the JavaScript MIME type.”
sed -i 's@application/javascript.*@application/javascript js mjs;@g' /etc/nginx/mime.types
Symlink the vhost to sites-enabled/ and check the nginx vhost syntax, then restart nginx:
Now that nginx is fully configured we can configure a cronjob, or systemd timer, to run once every two month and generate a new Letsencrypt certificate and then restart nginx:
cat << EOF > /etc/systemd/system/renew-letsencrypt.timer
[Unit]
Description=Renews Letsencrypt certificate every two month

[Timer]
OnCalendar=*-1/2-1 4:0:0
Persistent=true

[Install]
WantedBy=timers.target
EOF
systemctl daemon-reload
systemctl enable renew-letsencrypt.timer
systemctl start renew-letsencrypt.timer
systemctl status renew-letsencrypt.timer

● renew-letsencrypt.timer - Runs my custom script every two months
     Loaded: loaded (/etc/systemd/system/renew-letsencrypt.timer; enabled; vendor preset: enabled)
     Active: active (waiting) since Wed 2024-02-21 23:38:58 UTC; 8s ago
    Trigger: Fri 2024-03-01 04:00:00 UTC; 1 week 1 day left
   Triggers: ● renew-letsencrypt.service

Feb 21 23:38:58 blu-tool-prod-nc-1 systemd[1]: Started Runs my custom script every two months.
To install MariaDB use the following command. We will also install pwgen
, a password generator that generates reasonably secure passwords, which we will need to generate passwords for the MySQL root user and the MySQL nextcloud user:
apt install mariadb-server pwgen
The mariadb-server apt package comes with a small script to enhance security right after the installation. This script will ask us to define a root password for MySQL, so lets generate one using “pwgen”. The maximum character length for MySQL passwords is 32. After this you want to answer all questions of “mysql_secure_installation” with “Y”:
pwgen -s 32 1
l6tkf6pbX9Df8JLXewcFsAEyRQ6SfIvZ
mysql_secure_installation

NOTE: RUNNING ALL PARTS OF THIS SCRIPT IS RECOMMENDED FOR ALL MariaDB
      SERVERS IN PRODUCTION USE!  PLEASE READ EACH STEP CAREFULLY!

In order to log into MariaDB to secure it, we'll need the current
password for the root user. If you've just installed MariaDB, and
haven't set the root password yet, you should just press enter here.

Enter current password for root (enter for none):
OK, successfully used password, moving on...

Setting the root password or using the unix_socket ensures that nobody
can log into the MariaDB root user without the proper authorisation.

You already have your root account protected, so you can safely answer 'n'.

Switch to unix_socket authentication [Y/n] Y
Enabled successfully!
Reloading privilege tables..
 ... Success!


You already have your root account protected, so you can safely answer 'n'.

Change the root password? [Y/n] Y
New password:
Re-enter new password:
Password updated successfully!
Reloading privilege tables..
 ... Success!


By default, a MariaDB installation has an anonymous user, allowing anyone
to log into MariaDB without having to have a user account created for
them.  This is intended only for testing, and to make the installation
go a bit smoother.  You should remove them before moving into a
production environment.

Remove anonymous users? [Y/n] Y
 ... Success!

Normally, root should only be allowed to connect from 'localhost'.  This
ensures that someone cannot guess at the root password from the network.

Disallow root login remotely? [Y/n] Y
 ... Success!

By default, MariaDB comes with a database named 'test' that anyone can
access.  This is also intended only for testing, and should be removed
before moving into a production environment.

Remove test database and access to it? [Y/n] Y
 - Dropping test database...
 ... Success!
 - Removing privileges on test database...
 ... Success!

Reloading the privilege tables will ensure that all changes made so far
will take effect immediately.

Reload privilege tables now? [Y/n] Y
 ... Success!

Cleaning up...

All done!  If you've completed all of the above steps, your MariaDB
installation should now be secure.

Thanks for using MariaDB!
It is advisable to save the root password in a “/root/.my.cnf” file so we do not have to enter it every time we login. As the Linux root user can easily reset the MySQL password, it is safe to save the password in plain text, as long as it is only accessible to the root user:
The Nextcloud documentation
describes what MariaDB settings to apply. Note that the documentation advises to save the settings to “/etc/mysql/my.cnf” - this is inadvisable though, because this file is managed by the apt package manager. This means that apt may want to overwrite this file with new defaults when a new version of mariadb-server is available for upgrading. If you make changes to the file, an automatic apt security upgrade will not setup the newer version of this config file.
Luckily MariaDB provides the option to define custom config files below “/etc/mysql/mariadb.conf.d/” to override the defaults set by the config files managed by the package manager:
systemctl restart mariadb.service
systemctl status mariadb.service
● mariadb.service - MariaDB 10.6.16 database server
     Loaded: loaded (/lib/systemd/system/mariadb.service; enabled; vendor preset: enabled)
     Active: active (running) since Thu 2024-02-22 04:35:06 UTC; 2s ago
       Docs: man:mariadbd(8)
             https://mariadb.com/kb/en/systemd/
    Process: 5681 ExecStartPre=/usr/bin/install -m 755 -o mysql -g root -d /var/run/mysqld (code=exited, status=0/SUCCESS)
    Process: 5682 ExecStartPre=/bin/sh -c systemctl unset-environment _WSREP_START_POSITION (code=exited, status=0/SUCCESS)
    Process: 5684 ExecStartPre=/bin/sh -c [ ! -e /usr/bin/galera_recovery ] && VAR= ||   VAR=`cd /usr/bin/..; /usr/bin/galera_recovery`; [ $? -eq 0 ]   && systemctl set-environment _WSREP_START_POSITION=$VAR || exit 1 (code=exited, status>
    Process: 5792 ExecStartPost=/bin/sh -c systemctl unset-environment _WSREP_START_POSITION (code=exited, status=0/SUCCESS)
    Process: 5794 ExecStartPost=/etc/mysql/debian-start (code=exited, status=0/SUCCESS)
   Main PID: 5781 (mariadbd)
     Status: "Taking your SQL requests now..."
      Tasks: 12 (limit: 38105)
     Memory: 60.9M
        CPU: 348ms
     CGroup: /system.slice/mariadb.service
             └─5781 /usr/sbin/mariadbd

Feb 22 04:35:06 cloud mariadbd[5781]: 2024-02-22  4:35:06 0 [Note] Server socket created on IP: '127.0.0.1'.
Feb 22 04:35:06 cloud mariadbd[5781]: 2024-02-22  4:35:06 0 [Note] /usr/sbin/mariadbd: ready for connections.
Feb 22 04:35:06 cloud mariadbd[5781]: Version: '10.6.16-MariaDB-0ubuntu0.22.04.1-log'  socket: '/run/mysqld/mysqld.sock'  port: 3306  Ubuntu 22.04
Feb 22 04:35:06 cloud systemd[1]: Started MariaDB 10.6.16 database server.
Feb 22 04:35:06 cloud /etc/mysql/debian-start[5799]: Looking for 'mariadb' as: /usr/bin/mariadb
Feb 22 04:35:06 cloud /etc/mysql/debian-start[5799]: Looking for 'mariadb-check' as: /usr/bin/mariadb-check
Feb 22 04:35:06 cloud /etc/mysql/debian-start[5799]: This installation of MariaDB is already upgraded to 10.6.16-MariaDB.
Feb 22 04:35:06 cloud /etc/mysql/debian-start[5799]: There is no need to run mysql_upgrade again for 10.6.16-MariaDB.
Feb 22 04:35:06 cloud /etc/mysql/debian-start[5799]: You can use --force if you still want to run mysql_upgrade
Feb 22 04:35:06 cloud /etc/mysql/debian-start[5807]: Checking for insecure root accounts.
After configuring MariaDB we need to create a SQL database and user for the nextcloud service. You can use pwgen again to generate a resonably secure password. The maximum character length for MySQL passwords is 32:
pwgen -s 32 1
KuSJ1Ur64IFXXwEpVdEOaYbSKJrp72wN
mysql
Welcome to the MariaDB monitor.  Commands end with ; or \g.
Your MariaDB connection id is 31
Server version: 10.6.16-MariaDB-0ubuntu0.22.04.1 Ubuntu 22.04

Copyright (c) 2000, 2018, Oracle, MariaDB Corporation Ab and others.

Type 'help;' or '\h' for help. Type '\c' to clear the current input statement.

MariaDB [(none)]>
Use the following SQL statements to create a SQL database and user:
CREATE USER 'nextcloud'@'localhost' IDENTIFIED BY 'KuSJ1Ur64IFXXwEpVdEOaYbSKJrp72wN';
CREATE DATABASE IF NOT EXISTS nextcloud CHARACTER SET utf8mb4 COLLATE utf8mb4_general_ci;
GRANT ALL PRIVILEGES on nextcloud.* to 'nextcloud'@'localhost';
FLUSH PRIVILEGES;
exit
Refer to the Nextcloud system requirements page
to determine which PHP Version is required to run the latest stable release of nextcloud. At the time of this writing, the latest stable release is v28.0.2. You can see the available releases at the Nextcloud server github releases page
.
Make sure to pick a tag labeled “Latest” in green and not “Pre-release” in brown color. This will commonly not be the first tag listed on this page so you have to scroll down a bit.
Do not choose this:
Scroll down a bit and choose the latest stable release:
Knowing the latest stable release version number, we can now select the correct page of the nextcloud documentation:
Viewing the correct version of the documentation, we can determine the PHP version recommended for this Nextcloud version - at the time of this writing this is PHP 8.2.
The PHP packages provided by Ubuntu are always for one specific PHP version - at the time of this writing Ubuntus default PHP version is 8.1 (we need 8.2).
apt-cache show php | grep ^Version
Version: 2:8.1+92ubuntu1
Blunix recommends not to use the Ubuntu provided packages but instead to setup the “Sury PPA
” (Personal Package Archive). Sury is a Debian developer
that provides an apt repository for installing specific PHP versions. On Ubuntu you can setup his ppa with the following command.
Note that Sury states that “if you are using nginx, you are advised to add ppa:ondrej/nginx-mainline or ppa:ondrej/nginx”. As Sury does not provide a reason for this and as I (the author of this blog post) have hosted PHP pretty much since wham and have never experienced any need to use an Nginx package other than that provided by Ubuntu or Debian, I will stick to the Ubuntu provided nginx version.
add-apt-repository ppa:ondrej/php
PPA publishes dbgsym, you may need to include 'main/debug' component
Repository: 'deb https://ppa.launchpadcontent.net/ondrej/php/ubuntu/ jammy main'
Description:
Co-installable PHP versions: PHP 5.6, PHP 7.x, PHP 8.x and most requested extensions are included. Only Supported Versions of PHP (http://php.net/supported-versions.php) for Supported Ubuntu Releases (https://wiki.ubuntu.com/Releases) are provided. Don't ask for end-of-life PHP versions or Ubuntu release, they won't be provided.

Debian oldstable and stable packages are provided as well: https://deb.sury.org/#debian-dpa

You can get more information about the packages at https://deb.sury.org

IMPORTANT: The -backports is now required on older Ubuntu releases.

BUGS&FEATURES: This PPA now has a issue tracker:
https://deb.sury.org/#bug-reporting

CAVEATS:
1. If you are using php-gearman, you need to add ppa:ondrej/pkg-gearman
2. If you are using apache2, you are advised to add ppa:ondrej/apache2
3. If you are using nginx, you are advised to add ppa:ondrej/nginx-mainline
	   or ppa:ondrej/nginx

PLEASE READ: If you like my work and want to give me a little motivation, please consider donating regularly: https://donate.sury.org/

WARNING: add-apt-repository is broken with non-UTF-8 locales, see
https://github.com/oerdnj/deb.sury.org/issues/56 for workaround:

# LC_ALL=C.UTF-8 add-apt-repository ppa:ondrej/php
More info: https://launchpad.net/~ondrej/+archive/ubuntu/php
Adding repository.
Press [ENTER] to continue or Ctrl-c to cancel.Adding deb entry to /etc/apt/sources.list.d/ondrej-ubuntu-php-jammy.list
Adding disabled deb-src entry to /etc/apt/sources.list.d/ondrej-ubuntu-php-jammy.list
Adding key to /etc/apt/trusted.gpg.d/ondrej-ubuntu-php.gpg with fingerprint 14AA40EC0831756756D7F66C4F4EA0AAE5267A6C
Hit:1 http://mirror.hetzner.com/ubuntu/packages jammy InRelease
Hit:2 http://mirror.hetzner.com/ubuntu/packages jammy-updates InRelease
Hit:3 http://mirror.hetzner.com/ubuntu/packages jammy-backports InRelease
Hit:4 http://mirror.hetzner.com/ubuntu/packages jammy-security InRelease
Hit:5 http://de.archive.ubuntu.com/ubuntu jammy InRelease
Hit:6 http://de.archive.ubuntu.com/ubuntu jammy-updates InRelease
Hit:7 http://de.archive.ubuntu.com/ubuntu jammy-backports InRelease
Get:8 https://ppa.launchpadcontent.net/ondrej/php/ubuntu jammy InRelease [23.9 kB]
Get:9 http://security.ubuntu.com/ubuntu jammy-security InRelease [110 kB]
Get:10 https://ppa.launchpadcontent.net/ondrej/php/ubuntu jammy/main amd64 Packages [122 kB]
Get:11 https://ppa.launchpadcontent.net/ondrej/php/ubuntu jammy/main Translation-en [37.5 kB]
Fetched 294 kB in 1s (387 kB/s)
Reading package lists... Done
After this we can install PHP packages in the desired version:
apt show php8.2-fpm
Package: php8.2-fpm
Version: 8.2.15-1+ubuntu22.04.1+deb.sury.org+1
[...]
The Nextcloud documentation
has a list of apt packages it requires to be installed. To us this list seems incomplete and from our experience, the following apt command contains the complete list of packages.
Note the dashes at the end of the last three packages. Appending a dash to a package name during apt install ensures that the package is removed if it is currently installed!
We added these packages to be removed as this ensures that no other PHP-FPM versions are installed. For whatever reason Ubuntu installed those along PHP 8.2 at the time of this writing. Also note that the package php-mysqli can conflict with the MySQL PHP library we require, hence this package is to be uninstalled.
The next step is to define a PHP-FPM pool - this is a group of PHP-FPM worker processes responsible for a specific project, in our case Nextcloud. Run the following commands to create a PHP-FPM pool configuration:
To prevent the Nextcloud error “The OPcache interned strings buffer is nearly full. To assure that repeating strings can be effectively cached, it is recommended to apply opcache.interned_strings_buffer to your PHP configuration with a value higher than `8’”:
sed -i 's/;opcache.interned_strings_buffer.*/opcache.interned_strings_buffer=16/g' /etc/php/8.2/cli/php.ini
sed -i 's/;opcache.interned_strings_buffer.*/opcache.interned_strings_buffer=16/g' /etc/php/8.2/fpm/php.ini
When installing PHP-FPM, a default pool config file is always created below “/etc/php/8.2/fpm/pool.d/www.conf”. This file can be removed:
rm /etc/php/8.2/fpm/pool.d/www.conf
At this point we can not start php8.2-fpm yet, as the tmp directory we configured (/var/www/tmp) is supposed to be a 512 MB RAM disk (or Linux tmpfs). We have not created and mounted this directory yet as it has to be owned by the Nextcloud Linux user and group, which we will create in the following steps. So for now, we can just keep php-fpm turned off and start it later when ready:
The www-data user, which runs the Nginx processes, needs to have access to files accessible to the nextcloud Linux group, such as “/var/www/nextcloud/nextcloud/”:
usermod --append --groups nextcloud www-data
Restart Nginx for the Linux group permission changes to take effect:
We configured PHP-FPM to write tmp files to “/var/www/tmp”, which we will now configure to be a mounted RAM disk for extra speed (a so called Linux tmpfs
):
We will download a .tar.bz2 archive of the latest version of nextcloud from the official download page
: scroll down to “Community Projects” -> “Archive” to obtain the download links.
The following commands have to be executed as the newly created nextcloud user:
Download the sha256 checksum file and verify the archive:
wget -q https://download.nextcloud.com/server/releases/latest.tar.bz2.sha256
sha256sum -c latest.tar.bz2.sha256
latest.tar.bz2: OK
Download and import the nextcloud gpg
- public key
:
wget -q https://nextcloud.com/nextcloud.asc
gpg2 --import nextcloud.asc
gpg: key D75899B9A724937A: "Nextcloud Security " not changed
gpg: Total number processed: 1
gpg:              unchanged: 1

wget -q https://download.nextcloud.com/server/releases/latest.tar.bz2.asc
gpg2 --verify latest.tar.bz2.asc latest.tar.bz2
gpg: Signature made Thu 01 Feb 2024 09:46:27 AM UTC
gpg:                using RSA key 28806A878AE423A28372792ED75899B9A724937A
gpg: Good signature from "Nextcloud Security " [unknown]
gpg: WARNING: This key is not certified with a trusted signature!
gpg:          There is no indication that the signature belongs to the owner.
Primary key fingerprint: 2880 6A87 8AE4 23A2 8372  792E D758 99B9 A724 937A
Notice that gpg displays a waring message:
gpg: Good signature from "Nextcloud Security " [unknown]
gpg: WARNING: This key is not certified with a trusted signature!
gpg:          There is no indication that the signature belongs to the owner.
This refers to the gpg web of trust
, which is largely abandoned and considered a failure and can hence safely be ignored. You can prevent this warning message by assigning “ultimate trust” to the gpg public key:
gpg2 --edit-key security@nextcloud.com
gpg (GnuPG) 2.2.27; Copyright (C) 2021 Free Software Foundation, Inc.
This is free software: you are free to change and redistribute it.
There is NO WARRANTY, to the extent permitted by law.


pub  rsa4096/D75899B9A724937A
     created: 2016-06-14  expires: never       usage: SC
     trust: unknown       validity: unknown
sub  rsa4096/36B8EF1826F57923
     created: 2016-06-14  expires: never       usage: E
[ unknown] (1). Nextcloud Security

gpg> trust
pub  rsa4096/D75899B9A724937A
     created: 2016-06-14  expires: never       usage: SC
     trust: unknown       validity: unknown
sub  rsa4096/36B8EF1826F57923
     created: 2016-06-14  expires: never       usage: E
[ unknown] (1). Nextcloud Security

Please decide how far you trust this user to correctly verify other users' keys
(by looking at passports, checking fingerprints from different sources, etc.)

  1 = I don't know or won't say
  2 = I do NOT trust
  3 = I trust marginally
  4 = I trust fully
  5 = I trust ultimately
  m = back to the main menu

Your decision? 5
Do you really want to set this key to ultimate trust? (y/N) y

pub  rsa4096/D75899B9A724937A
     created: 2016-06-14  expires: never       usage: SC
     trust: ultimate      validity: unknown
sub  rsa4096/36B8EF1826F57923
     created: 2016-06-14  expires: never       usage: E
[ unknown] (1). Nextcloud Security
Please note that the shown key validity is not necessarily correct
unless you restart the program.

gpg> quit
When you verify the file one more time the warning message is gone:
gpg2 --verify latest.tar.bz2.asc latest.tar.bz2
gpg: Signature made Thu 01 Feb 2024 09:46:27 AM UTC
gpg:                using RSA key 28806A878AE423A28372792ED75899B9A724937A
gpg: Good signature from "Nextcloud Security " [ultimate]
After all checks have passed its time to unpack the archive:
tar -xf latest.tar.bz2
This will extract the directory “nextcloud” to the absolute path “/var/www/nextcloud/nextcloud/”, which is where we configured the document root for Nginx and PHP-FPM:
ls -l
total 182096
-rw-rw-r--  1 nextcloud nextcloud 186446961 Feb  1 09:46 latest.tar.bz2
-rw-rw-r--  1 nextcloud nextcloud       833 Feb  1 09:46 latest.tar.bz2.asc
-rw-rw-r--  1 nextcloud nextcloud        81 Feb 17 23:30 latest.tar.bz2.sha256
drwxr-xr-x 13 nextcloud nextcloud      4096 Feb  1 09:43 nextcloud
-rw-rw-r--  1 nextcloud nextcloud      3100 May  2  2022 nextcloud.asc
The following commands have to be executed as the root user again. Type “exit” to return back to the root user:
nextcloud@cloud:~$ exit
logout
root@cloud ~ #
Now that “/var/www/tmp” and “/var/www/nextcloud/nextcloud” exist, PHP-FPM can be started:
In the next chapter we will mount an external disk for additional storage of the Nextcloud data directory (where the users files will be uploaded to). You can skip this step if your Hetnzer Cloud server comes with enough root disk for your purposes by default.
Keep in mind that if you do not mount an additional disk you migh accidentally reach 100% disk capacity on the root disk of the server, which will lead to an unstable system. It is hence highly recommended to mount a different partition to the “/var/www/nextcloud/nextcloud/data/” directory.
Before starting nextcloud for the first time, the directory “/var/www/nextcloud/nextcloud/data”, where user data will be stored, has to be manually created. Normally the installer creates it, but as we want to mount the directory before Nextcloud writes data to it, we have to do this before accessing Nextcloud for the first time.
Note that the Nextcloud Security Hardening Guide
recommends to place the Nextcloud data directory outside of the directory “/var/www/”. After googling around a bit I have not found a good reason why that should be done. The documentation does not state a specific reason. I assume this is because if you misconfigure the webserver (Nginx in our case), you can accidentally allow acccess to the data directory to the public without authentication. As the Nginx Vhost in this Blogpost is definitely not configured incorrectly, we decided to skip this step.
With Hetzner we have three options for storage: a Hetzner Storage Box
(very cheap and the slowest option), Hetzner Cloud Volumes
(fast, not cheap but not expensive either) or, in case you rented a dedicated server (new or from the server auctions), the local disks of this server using LVM (Logical Volume Manager)
.
As a recommendation: a cloud server with reasonable ressources and one additional 500 GB volume will cost you around 50.00 € per month. For this price you can get three times as much ressources and disk space from a dedicated server, plus the disks will be faster. The downside is that Hetzner Cloud instances and volumes are setup in a High Availability fashion, which single dedicated servers are obiously not. The Hetzner Cloud Volumes are CEPH
storage (to the knowledge of the author). Hence you have to choose between performance and reliability.
If you don’t care about money and you are serious about uptime go with the Hetzner Cloud and its Cloud Volumes. If there is an issue with the underlying hardware, the Hetzner Cloud Hypervisor will fix it automatically. I (the author) have been hosting on the Hetzner Cloud since it was first created (before that on Hetzner virtual servers or vservers) and in my experience there is a Hetzner related issue with the instances that causes about an hour of downtime once every three years.
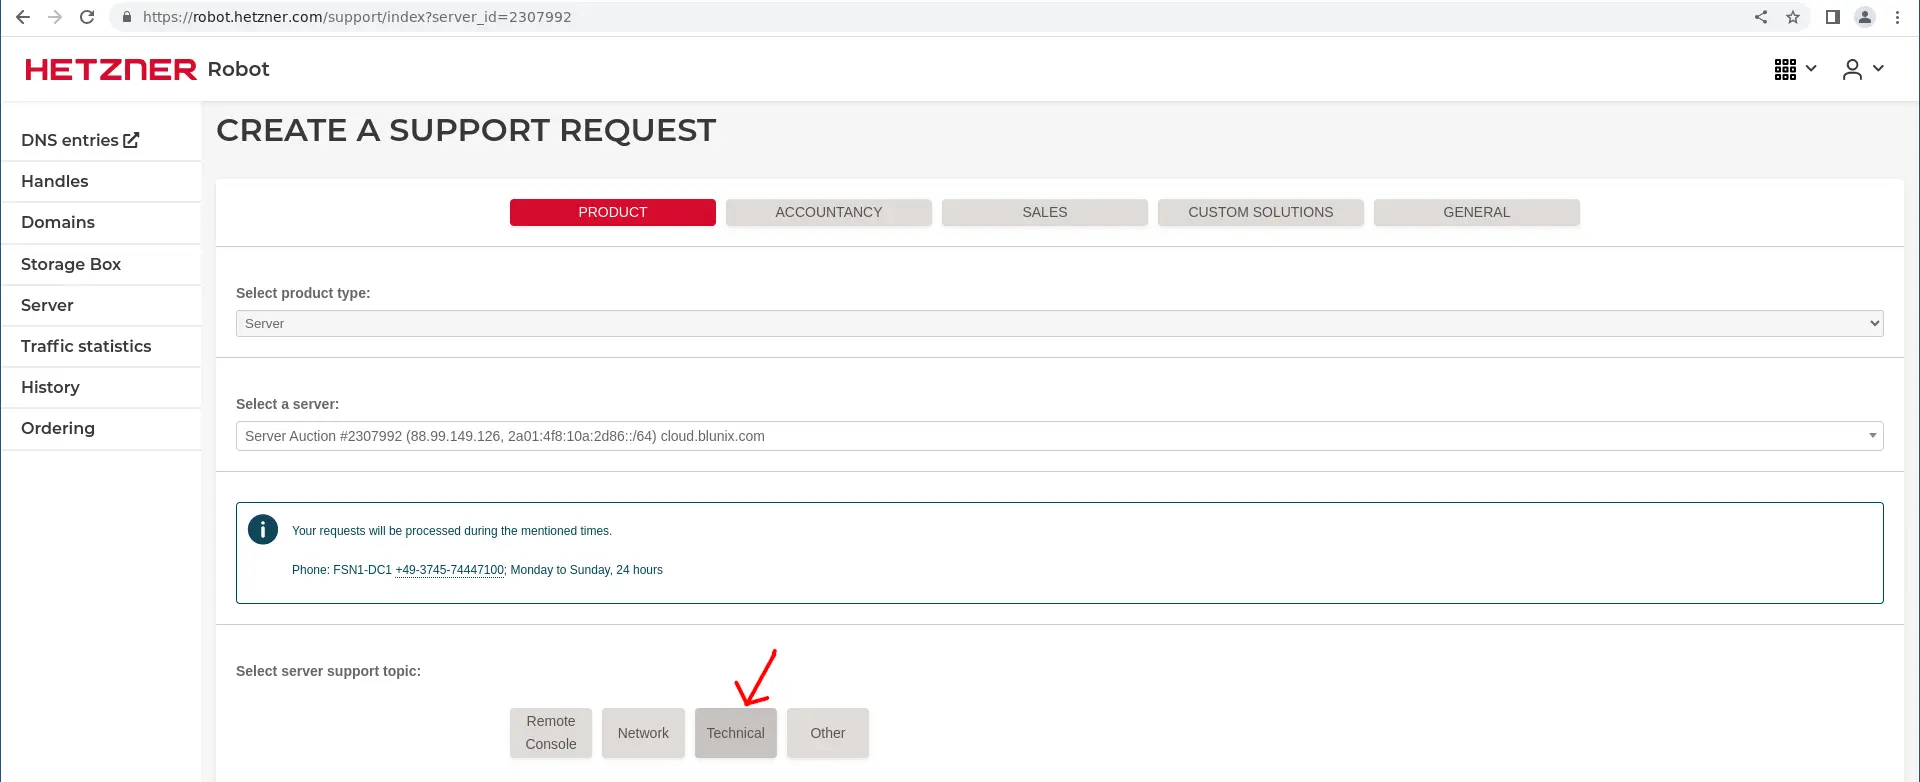
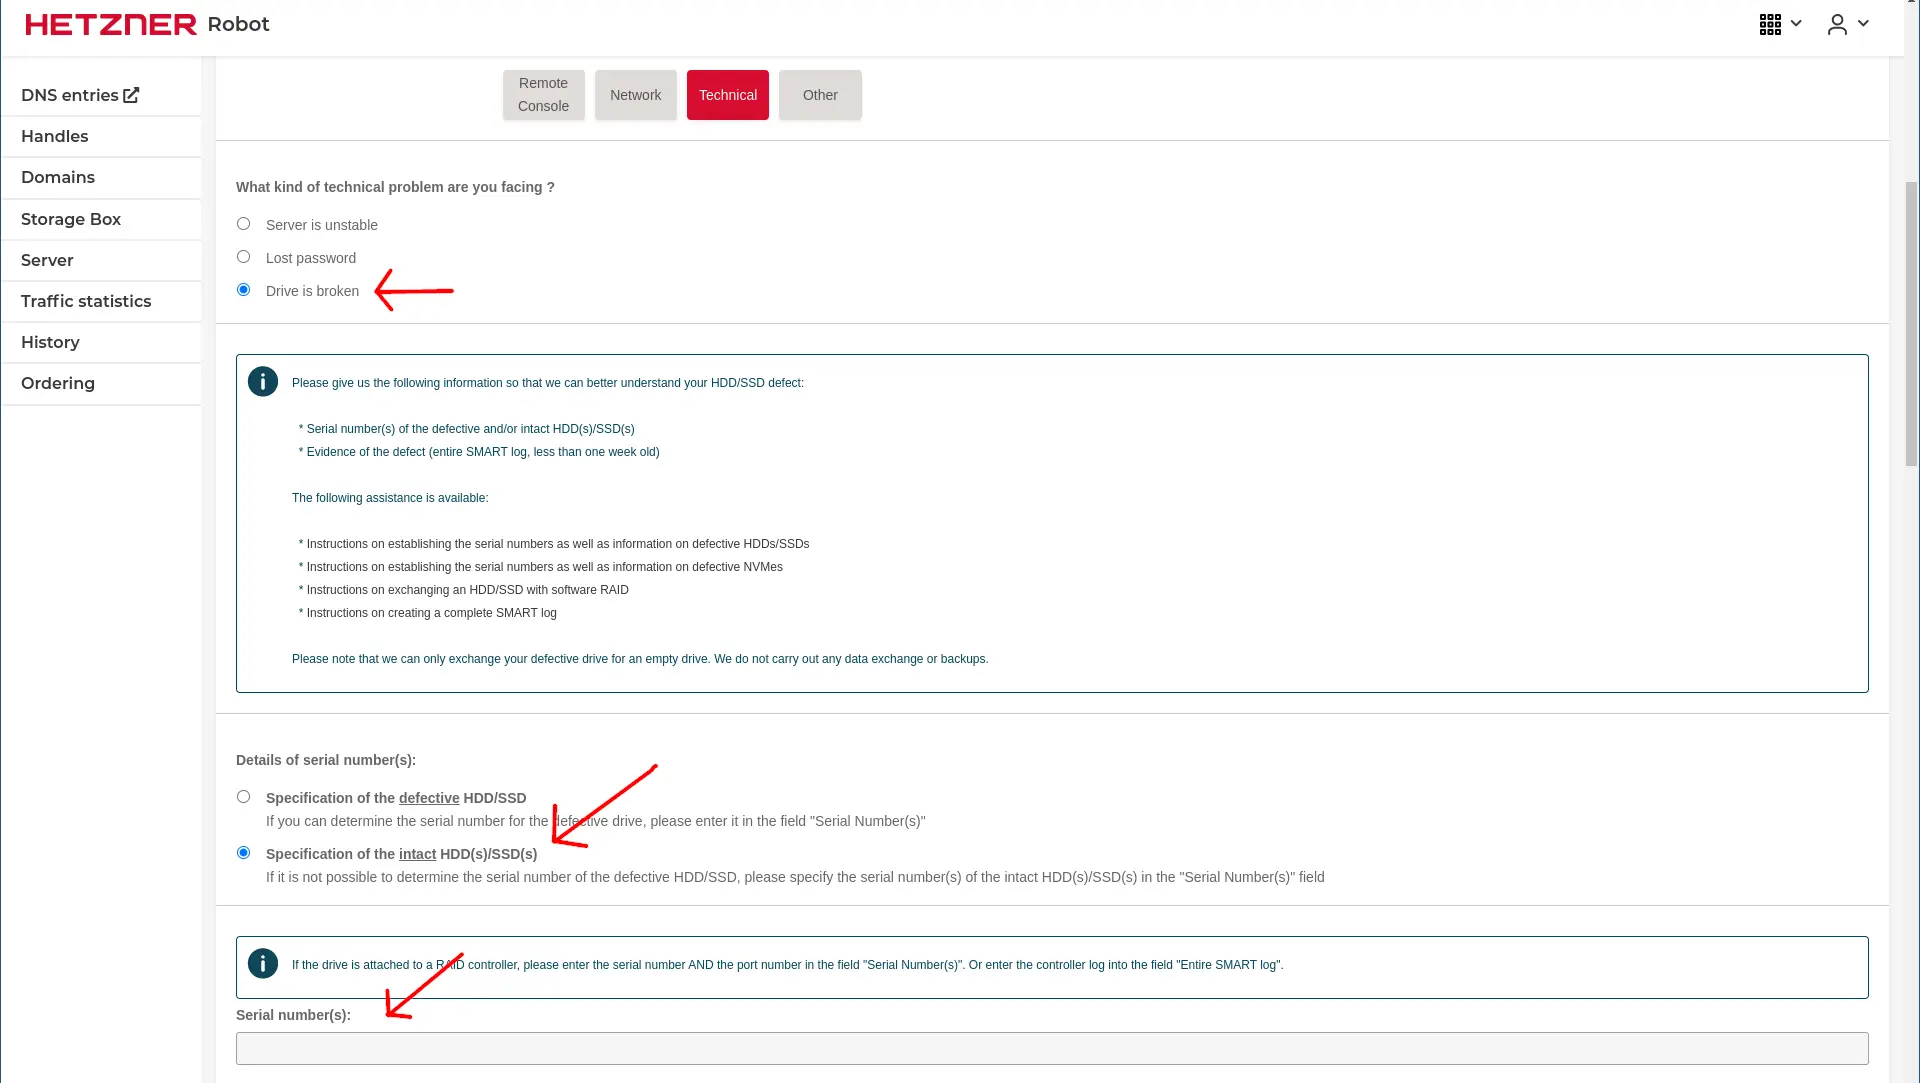
With a dedicated server you can get better speed, but if the hardware fails (which in the experience of the Author happens around once every three years, usually with a failing SSD or Hard Drive, which you can detect by monitoring the S.M.A.R.T. data
of your hard drives with your monitoring system of choice using the Linux utility smartmontools
) then rather go for a dedicated server. It will give you better performance for a lower price at the cost of a (slightly) higher chance of downtime.
Keep in mind that you only need disks that are fast enough to manage your concurrent number of users + how much they can up- or download using their respective internet connection.
If you are very serious about saving money then go for a Hetzner Storage Box in combination with a small cloud server or a dedicated server from the Hetzner server auctions, but don’t expect the Storage Box to offer flying performance. Also keep in mind that servers from the auctions have been running for a while and will fail sooner than new hardware. Hetzner is fast (about two hours on average) at replacing faulty disks, SSDs and other hardware upon request via the Hetzner WebUI.
The cheapest option to get lots of GB or TB of storage is the Hetzner Storage Box
.
We will mount the storage box using SSHFS, the SSH network File System
. Hetzner offers some documentation
on how to setup the storage box correctly, which sadly is a bit incomplete and lacks the correct /etc/fstab options for using it with SSH public key authentication.
We will configure a systemd mount service to mount the Hetzner Storage Box using SSHFS. First install SSHFS using apt:
apt install sshfs
Generate a dedicated SSH keypair for the root user:
mkdir /root/.ssh
chmod 700 /root/.ssh
ssh-keygen -t ed25519 -a 100 -o -N '' -f /root/.ssh/id_ed25519_storage_box
Generating public/private ed25519 key pair.
Your identification has been saved in /root/.ssh/id_ed25519_storage_box
Your public key has been saved in /root/.ssh/id_ed25519_storage_box.pub
The key fingerprint is:
SHA256:dCDYkdo0HJFFKEk8LEgHVU6S9W7Vyxuz0IrGjJ8SF1w
The key's randomart image is:
+--[ED25519 256]--+
|.+oB=O=X+        |
|. o.@ X. E.      |
|   . B.oo...     |
|    . o+..o .    |
|       oS. *     |
|     .=.. o =    |
|     .o= . o     |
|     .o .        |
|      .o         |
+----[SHA256]-----+
Enable SSH support for your Storage Box and make sure to save the password (we will need it once).
Install the SSH public key to use the storage box without a password. Note that we need to use port 23, not 22
.
cat ~/.ssh/id_ed25519_storage_box.pub | ssh -p 23 u391436@u391436.your-storagebox.de install-ssh-key
u391436@u391436.your-storagebox.de's password:
Key No. 1 (ssh-ed25519 root@cloud) was installed in RFC4716 format
Key No. 1 (ssh-ed25519 root@cloud) was installed in OpenSSH format
Try mounting the storage box using sshfs. Note that we always mount the /home directory
of the storage box. Hetzner configured the Storage Box so only this directory is writable.
Apply the changes to the systemd configuration and start the systemd mount:
systemctl daemon-reload
systemctl enable var-www-nextcloud-nextcloud-data.mount
Created symlink /etc/systemd/system/multi-user.target.wants/var-www-nextcloud-nextcloud-data.mount → /etc/systemd/system/var-www-nextcloud-nextcloud-data.mount.

systemctl restart var-www-nextcloud-nextcloud-data.mount
systemctl status var-www-nextcloud-nextcloud-data.mount
● var-www-nextcloud-nextcloud-data.mount - Hetzner Storage Box sshfs port 23 systemd mount
     Loaded: loaded (/etc/systemd/system/var-www-nextcloud-nextcloud-data.mount; disabled; vendor preset: enabled)
     Active: active (mounted) since Tue 2024-02-20 20:16:39 UTC; 21ms ago
      Where: /var/www/nextcloud/nextcloud/data
       What: u391436@u391436.your-storagebox.de:/home
      Tasks: 5 (limit: 4524)
     Memory: 2.3M
        CPU: 55ms
     CGroup: /system.slice/var-www-nextcloud-nextcloud-data.mount
             ├─69974 ssh -p 23 -x -a -oClearAllForwardings=yes -oIdentityFile=/root/.ssh/id_ed25519_storage_box -2 u391436@u391436.your-storagebox.de -s sftp
             └─69976 /sbin/mount.sshfs u391436@u391436.your-storagebox.de:/home /var/www/nextcloud/nextcloud/data -o "rw,allow_other,IdentityFile=/root/.ssh/id_ed25519_storage_box,reconnect,uid=900,gid=900,default_permissions,ssh_command=ssh -p 23,"

Feb 20 20:16:39 blu-tool-prod-nc-1 systemd[1]: Mounting Hetzner Storage Box sshfs port 23 systemd mount...
Feb 20 20:16:39 blu-tool-prod-nc-1 systemd[1]: Mounted Hetzner Storage Box sshfs port 23 systemd mount.
Check if the directory was mounted correctly and is owned by the nextcloud user and group:
mount | grep nextcloud; ls -lha /var/www/nextcloud/nextcloud/data

u391436@u391436.your-storagebox.de:/home on /var/www/nextcloud/nextcloud/data type fuse.sshfs (rw,nosuid,nodev,relatime,user_id=900,group_id=900,default_permissions,allow_other,_netdev,x-systemd.automount)
total 12K

drwxr-xr-x 1 nextcloud nextcloud    3 Feb 17 01:02 .
drwxr-x--- 6 nextcloud nextcloud 4.0K Feb 20 20:15 ..
drwx------ 1 nextcloud nextcloud    3 Feb 17 01:03 .ssh
Notice that this gives the nextcloud user the ability to write to the “.ssh/authorized_keys” file for the storage box. Thats not brilliant, but if your Nextcloud application is compromised it can read all of the data in the box anyways. We contacted Hetzner and asked if we could use “chattr +i ./ssh/authorized_keys” or anything else to make the file read only, but they declined saying that removing write permission for the file was not possible.
If you run Nextcloud on a Hetzner Cloud instance, adding additional storage with Hetzner Cloud Volumes
is a lot simpler to configure than with the storage box. Also the read and write speed is faster.
We will configure a systemd mount for the Hetzner Cloud volume with ext4
mount options tweaked for performance.
“commit=60” forces a full sync of all data and ext4 journal to be written to the physical disk or SSD every 60 seconds. If there is a loss of power the filesystem itself will not be damaged thanks to ext4 journaling.
“barrier=0” disables ext4 barriers
, which ensure metadata is correctly written and ordered on disk, even when the write caches loses power. As we use a highly redundant Hetzner Cloud volume, we (most likely) don’t need that.
“data=writeback” lets the filesystem delay writing data to disk, which can improve performance. It does this by not journaling the data and only the metadata. This increases the risk of data corruption in the event of a power failure or system crash. As the volume is provided by Hetzners highly available volume service, that should be ok.
To apply the changes to the systemd configuration and start the systemd mount:
systemctl daemon-reload
systemctl enable var-www-nextcloud-nextcloud-data.mount
Created symlink /etc/systemd/system/multi-user.target.wants/var-www-nextcloud-nextcloud-data.mount → /etc/systemd/system/var-www-nextcloud-nextcloud-data.mount.

systemctl restart var-www-nextcloud-nextcloud-data.mount
chown nextcloud:nextcloud /var/www/nextcloud/nextcloud/data
systemctl status var-www-nextcloud-nextcloud-data.mount
● var-www-nextcloud-nextcloud-data.mount - Hetzner Cloud Volume systemd mount
     Loaded: loaded (/etc/systemd/system/var-www-nextcloud-nextcloud-data.mount; disabled; vendor preset: enabled)
     Active: active (mounted) since Tue 2024-02-20 22:31:47 UTC; 16ms ago
      Where: /var/www/nextcloud/nextcloud/data
       What: /dev/sdb
      Tasks: 0 (limit: 4524)
     Memory: 16.0K
        CPU: 3ms
     CGroup: /system.slice/var-www-nextcloud-nextcloud-data.mount

Feb 20 22:31:47 blu-tool-prod-nc-1 systemd[1]: Mounting Hetzner Cloud Volume systemd mount...
Feb 20 22:31:47 blu-tool-prod-nc-1 systemd[1]: Mounted Hetzner Cloud Volume systemd mount.
If you selected “Choose mount options: Automatic” during the volumes creation, Hetzner will automatically create an “/etc/fstab” entry on the server and mount the volume. We can remove that entry and unmount the volume where Hetzner mounted it:
umount /mnt/HC_Volume_*
sed '/HC_Volume/d' /etc/fstab
On first opening the page https://cloud.your-company.com you need to enter the MySQL username and password that we created while installing Mariadb
:
This fist login will create the “/var/www/nextcloud/nextcloud/config/config.php” file, where we need to add some settings for additional performance and security. Open the Nextcloud config file in an editor and append the following lines at the bottom, but before the final “]”. There is no need to restart PHP-FPM after this.
Sidenote: The usage of “–define apc.enable_cli=1” fixes the Error: “OCP\HintException: [0]: Memcache OC\Memcache\APCu not available for local cache (Is the matching PHP module installed and enabled?)”
systemctl daemon-reload

systemctl restart nextcloud-cronjob.service
systemctl status nextcloud-cronjob.service
● nextcloud-cronjob.service - Nextcloud systemd cron.php timer
     Loaded: loaded (/etc/systemd/system/nextcloud-cronjob.service; static)
     Active: active (running) since Sun 2024-02-25 13:27:01 UTC; 14s ago
TriggeredBy: ● nextcloud-cronjob.timer
    Process: 6201 ExecCondition=/usr/bin/php8.2 --define apc.enable_cli=1 -f /var/www/nextcloud/nextcloud/occ status -e (code=exited, status=0/SUCCESS)
   Main PID: 6208 (php8.2)
      Tasks: 1 (limit: 38105)
     Memory: 38.8M
        CPU: 462ms
     CGroup: /system.slice/nextcloud-cronjob.service
             └─6208 /usr/bin/php8.2 --define apc.enable_cli=1 -f /var/www/nextcloud/nextcloud/cron.php

Feb 25 13:27:01 cloud systemd[1]: Starting Nextcloud systemd cron.php timer...
Feb 25 13:27:01 cloud systemd[1]: Started Nextcloud systemd cron.php timer.

systemctl enable --now nextcloud-cronjob.timer
Created symlink /etc/systemd/system/timers.target.wants/nextcloud-cronjob.timer → /etc/systemd/system/nextcloud-cronjob.timer.

systemctl status nextcloud-cronjob.timer
● nextcloud-cronjob.timer - Run Nextcloud cron.php every 5 minutes
     Loaded: loaded (/etc/systemd/system/nextcloud-cronjob.timer; enabled; vendor preset: enabled)
     Active: active (running) since Sun 2024-02-25 13:27:01 UTC; 40s ago
    Trigger: n/a
   Triggers: ● nextcloud-cronjob.service

Feb 25 13:27:01 cloud systemd[1]: Started Run Nextcloud cron.php every 5 minutes.
Now that Nextcloud was started and accessed once it has created its logfile “/var/www/nextcloud/nextcloud/data/nextcloud.log”. This file can get quite large and hence resides in the mounted directory. We can now start fail2ban:
systemctl restart fail2ban.service
systemctl status fail2ban.service
● fail2ban.service - Fail2Ban Service
     Loaded: loaded (/lib/systemd/system/fail2ban.service; enabled; vendor preset: enabled)
     Active: active (running) since Thu 2024-02-22 06:02:53 UTC; 3s ago
       Docs: man:fail2ban(1)
   Main PID: 23263 (fail2ban-server)
      Tasks: 3 (limit: 38105)
     Memory: 11.8M
        CPU: 117ms
     CGroup: /system.slice/fail2ban.service
             └─23263 /usr/bin/python3 /usr/bin/fail2ban-server -xf start

Feb 22 06:02:53 cloud systemd[1]: Started Fail2Ban Service.
Feb 22 06:02:53 cloud fail2ban-server[23263]: Server ready
To view the active fail2ban jails use the fail2ban-client command:
fail2ban-client status
Status
|- Number of jail:      4
`- Jail list:      nextcloud, nginx-botsearch, nginx-http-auth, sshd
You now have a working Nextcloud installation. Congrats!
You should now look at https://cloud.blunix.com/settings/admin/overview to check if the admin WebUI displays any error messages. After that, you should run a Nextcloud security scan
against your server.
Sidenote: https://cloud.blunix.com/settings/admin/logging tells us “Could not load log entries”, and then shows the logs after about five to ten seconds. This github issue
states that this is related to my reasonably paranoid browser Librewolf
and the adblocker it comes with.
To replace a faulty disk, first select the support tab for your server:
Then select “Technical”:
You then need the serial number of the WORKING disk drive or SSD. We assume that the broken one is unresponsive. Issue the following command to determine the serial number of the working disk:
hdparm -I /dev/sda | grep 'Serial Number'
	Serial Number:      17071C5E4191