
Disposable Temporary Email Adresses with OpenSMTPD on Linux
This blogpost shows in simple steps how to configure an Ubuntu Linux 24.04 Server with OpenSMTPD to receive temporary disposable emails for account signups
This blogpost shows in simple steps how to configure an Ubuntu Linux 24.04 Server with OpenSMTPD to receive temporary disposable emails for account signups
Please contact us if anything is not clearly described, does not work, seems incorrect or if you require support.
This blogpost describes in very simple and easy to follow steps how to setup an ultra-cheap self-hosted solution for temporary email addresses. You can use these email addresses, for example, to sign up for various services, like facebook, instagram, reddit, protonmail and others.
This approach guarantees that the email addresses you use to signup are not blacklisted and reject your account creation, which is often the case with most public temp mail providers. It is a self-hosted alternative to larger services like temp-mail.org , which are constantly blacklisted.
For services that require receiving an SMS alongside an email address, we recommend the site sms-activate.org , which providers very cheap burner SMS numbers from most countries in the world (they did not sponsor this blogpost).
This article is written for people with little knowledge about Linux and hosting servers. All steps are described in great detail so that everyone can setup such a service. The cost for self-hosting a disposable email server is ten USD per year for a cheap domain (any top level domain is fine) as well as about four USD per month for the cheapest hetzner server. Any other hosting provider will do as well. You will need a public IPv4 address for this.
You will need a server that runs Ubuntu 24.04 with a public IPv4 address assigned to it. We prefer Hetzner for this, where the cheapest option is 4 Euros per month. As the server literally does nothing all day long, one CPU, two GB RAM and 20 GB of root disk are more than sufficient. If you can find a cheaper alternative that fits the very minimal requirements, go for it. I would try to find something with 2 GB RAM, but it should work well with 1 GB RAM as well. Shared CPU is of course no problem. The root disk space for an Ubuntu Linux server installation should be 10 GB or above.
Create the server and write down its IPv4 address.
Technically, IPv6 would work as well, and with Hetzner you have to pay a tiny bit less when not booking an IPv4 address. However, at the time of this writing only about 50% of the internet supports IPv6 , so you will have more luck with IPv4 addresses. If you sign up for large services like facebook, they will most likely work with IPv6 as well, but it is still extremely uncommon to host mailservers with IPv6 and it will look suspicious if you do, meaning that the likelyhood of your account getting suspended for using a burnermail services is higher.
The following steps will guide you through the installation process of OpenSMTPD for use as a disposable email server.
At the time of this writing, Debian 12 and Ubuntu 22.04 provide a OpenSMTPD version that is unable to accept some incoming TLS 1.3 connections . Hence you need to use Ubuntu 24.04, which provides a version where this is fixed.
Click any domain you think sounds funny. Hetzner offers (.de) domains for as low as 10 Euros per year.
Next we have to create some DNS records for it. There are some we need from a technical point of view in order to have emails delivered, and some that we create simply for the reason of not looking like a burnmail provider.
We will call our new burnmail server mail.example.com. While I recommend to keep the “mail”, you should obviously replace example.com with your domain in all the following sections.
Set up an A record for mail.example.com to point to the public IP address of your server.
Next we need an MX record. Point your MX record to mail.example.com. and do not forget the “.” at the end of the record. Some DNS providers web interfaces might add it automatically for you. For MX records you will have to state a number between 0 - 65535 for the “priority” of the MX records. This priority setting for MX records is useful if you use multiple mailservers for the same domain, which we don’t. Simply add any number here, something like one or ten or 100, it doesn’t matter.
This is everything we need to have emails delivered to us.
No sane person runs a mailserver simply for the purpose of only receiving emails unless it is a temporary email server. I have tested this method of hosting burnmail servers extensively, and so far nobody complained without the additional records that make it look like you could also send mails with it. But it doesn’t hurt to make the server look legitimate.
Remember that all of the following DNS records are only required if you want to SEND mail, not just receive it. Hence I will skip the explaination for all the reocrd types and what they do. Simply create them, they have no purpose for our usecase other than making your “mailserver” look legitimate.
Set a PTR record for your server. You can not do this with your Domain / DNS provider but you have to click or possibly request this with your hosting provider. This type of record is a reverse DNS record for the IP address of the server, meaning that requesting the PTR record for the IP address will resolve to the A record of your mailserver. Here is how you verify it:
First resolve the A record for the domain name of the mailserver, in this example mail.blunix.com:
host -t A mail.blunix.com
mail.blunix.com has address 85.215.236.191
And then resolve the PTR record for the IP address:
host 85.215.236.191
191.236.215.85.in-addr.arpa domain name pointer mail.blunix.com.
Create a type TXT record for example.com with the value:
“v=spf1 mx -all”Do not forget the quotes.
To verify visit the SPF verification tool at mxtoolbox.com (choose domain name: example.com).
Create a type TXT record for the domain _dmarc.example.com with the following contents and do not forget to add the double-quotes at the beginning and end of it:
“v=DMARC1; p=reject; sp=reject; pct=100; aspf=s; adkim=s; fo=1; ruf=mailto:postmaster@example.com; rua=mailto:postmaster@example.com”To verify visit the DMARC verification tool at mxtoolbox.com (choose domain name: example.com).
As stated above, this step is optional and only required for SENDING emails, not receiving them. Because of this, I will not explain what DKIM is, but only how to generate a record that looks realistic. Run the following command:
opendkim-genkey -b 1024 -d example.com -D .
This will generate two files, default.private and default.txt, in your current directory. Lets look at the contents of default.txt:
cat default.txt
default._domainkey  IN  TXT ( "v=DKIM1; h=sha256; k=rsa; "
      "p=MIGfMA0GCSqGSIb3DQEBAQUAA4GNADCBiQKBgQC3qeawGs9X+o7CAcsDMzt4oak31t2SNm/rBh/RWLXnPa22u1EEFycyatcqqz7npNDj+2ofcaDj77Hb7v0zXOvK/iLMzMgFS8xBS1RaFmGDP5ki3NlL5jVxuuFA0/aSKXjby+RwEAAVoUWAnNdSXwmBQdPkGMKmukrBaK4VHp7y+QIDAQAB" )  ; ----- DKIM key default for example.com
Copy this part, remove the double-quotes, format it like follows and create a TXT record for “default._domainkey.example.com” with this output:
v=DKIM1; h=sha256; k=rsa; p=MIGfMA0GCSqGSIb3DQEBAQUAA4GNADCBiQKBgQC3qeawGs9X+o7CAcsDMzt4oak31t2SNm/rBh/RWLXnPa22u1EEFycyatcqqz7npNDj+2ofcaDj77Hb7v0zXOvK/iLMzMgFS8xBS1RaFmGDP5ki3NlL5jVxuuFA0/aSKXjby+RwEAAVoUWAnNdSXwmBQdPkGMKmukrBaK4VHp7y+QIDAQAB
To verify visit the DKIM verification tool at mxtoolbox.com (choose domain name: example.com and selector: default)
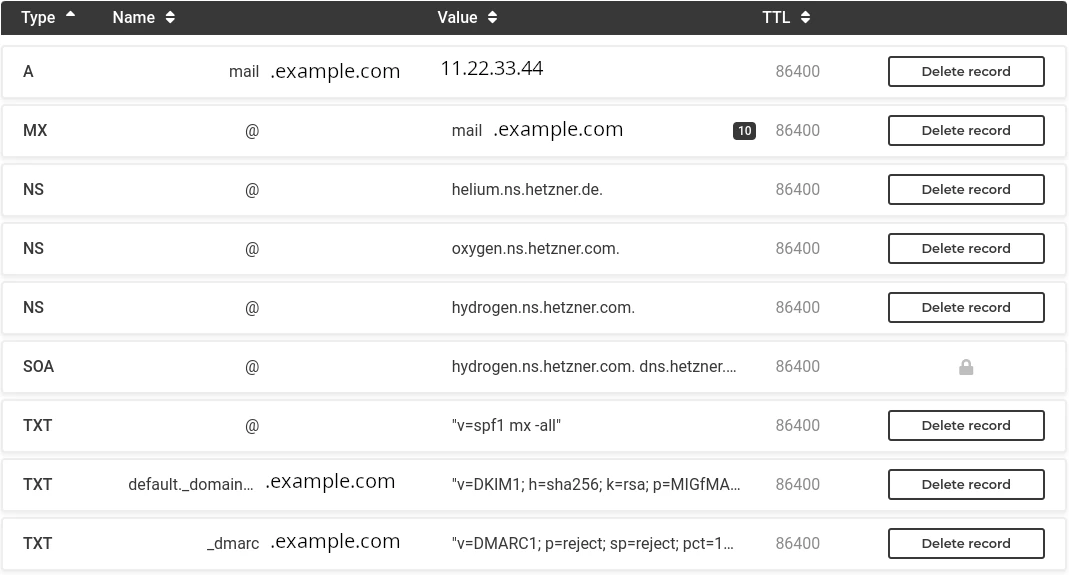
Here is a screenshot of the DNS records I configured while writing this blogpost:
Now that DNS is ready and configured, we can configure the server to receive emails.
As we of course want our new server to be secure, we should choose key-based authentication. To configure this, generate a ED25519 SSH keypair on your workstation:
ssh-keygen -t ed25519 -o -a 100
To install the public key on the server, issue the following command:
ssh-copy-id root@<new-server-IP-address>
After this login to the new server. It should not ask for a password anymore. Issue the following command to delete the root user password:
passwd -ld root
And also disable SSH password based authentication on the server:
sed -i 's/#PasswordAuthentication yes/PasswordAuthentication no/g' /etc/ssh/sshd_config
systemctl restart ssh.service
systemctl status ssh.service
● ssh.service - OpenBSD Secure Shell server
     Loaded: loaded (/usr/lib/systemd/system/ssh.service; disabled; preset: enabled)
     Active: active (running) since Mon 2024-05-06 16:29:42 UTC; 3s ago
TriggeredBy: ● ssh.socket
       Docs: man:sshd(8)
             man:sshd_config(5)
    Process: 7729 ExecStartPre=/usr/sbin/sshd -t (code=exited, status=0/SUCCESS)
   Main PID: 7731 (sshd)
      Tasks: 1 (limit: 2255)
     Memory: 1.2M (peak: 1.4M)
        CPU: 28ms
     CGroup: /system.slice/ssh.service
             └─7731 "sshd: /usr/sbin/sshd -D [listener] 0 of 10-100 startups"

May 06 16:29:42 mail.fimzo.at systemd[1]: Starting ssh.service - OpenBSD Secure Shell server...
May 06 16:29:42 mail.fimzo.at sshd[7731]: Server listening on :: port 22.
May 06 16:29:42 mail.fimzo.at systemd[1]: Started ssh.service - OpenBSD Secure Shell server.
First run the following commands to update, upgrade and install the required packages:
apt update
apt -y upgrade
apt -y dist-upgrade
apt -y install \
    opensmtpd opendkim \
    rspamd opensmtpd-filter-rspamd python3-pip \
    neomutt w3m\
    certbot \
    unattended-upgrades
opensmtpd opendkim: We will need OpenSMTPD for receiving emails. OpenDKIM is a tool we do not technically need, but we will create an optional DKIM DNS record below to make our mailserver look like it could send emails, which makes it look more legitimate. During the installation via apt, the OpenSMTPD configuration wizard will ask you some questions which are used to template an exemplary /etc/smtpd.conf - just press ENTER here for each question, we will overwrite /etc/smtpd.conf later.
rspamd opensmtpd-filter-rspamd python3-pip: As the server can receive emails, we will implement some basic anti spam protections, for which we will use Rspamd, amongst other basic approaches.
neomutt w3m: We will use neomutt to view the emails that were received. w3m is a text-based World Wide Web browser, which we will use to view html formatted emails.
certbot: We will need certbot to generate Letsencrypt SSL/TLS certificates, to that we can receive emails over SMTP with TLS encryption.
unattended-upgrades: We also need unattended-upgrades so that the Ubuntu server automatically installs apt security upgrades.
To activate automatic upgrades, run the following command and answer “yes” when prompted if you want to install security upgrades automatically.
dpkg-reconfigure unattended-upgrades
You should set the servers hostname to mail.example.com. To do this, issue the following commands:
hostname mail.example.com
echo mail.example.com > /etc/hostname
sed -i 's/^127.0.0.1.*/127.0.0.1 mail.example.com mail/g' /etc/hosts
This tutorial describes how to use a mail client called “neomutt” directly on the server. This way we can view incoming emails directly on the server without having to forward them to another email account on another email server.
If you are a little bit experienced with Linux, this should be ok and you should be able to comfortably view your singup emails with neomutt. If you want to instead forward emails to another account, a combination of this tutorial and [our tutorial on using OpenSMTP as an Email Relay for Linux Servers])/blog/secure-smtp-email-relay-on-debian-and-ubuntu-with-opensmtpd-instead-of-postfix.html) would be a good approach. If you are an enterprise customers please contact us for details on such a setup. If you are an enduser please visit the forum at linux.org and start a thread about this there - blunix is actively answering questions in this forum.
First add an unprivileged Linux user called “tempmail”:
adduser --quiet --system --group --disabled-password --shell /bin/bash --home /home/tempmail tempmail
Now setup the same SSH public key that we use to automatically login to the root user account:
cp -r /root/.ssh /home/tempmail/
chown -R tempmail:tempmail /home/tempmail/.ssh
Next we create the required directory structure so that OpenSMTPD can store received mails:
mkdir -p /home/tempmail/Mail/{cur,new,tmp}
chown -R tempmail:tempmail /home/tempmail/Mail
With certbot already installed we can now generate a Letsencrypt certificate for our mailserver.
certbot certonly --non-interactive --agree-tos --standalone --register-unsafely-without-email --domain mail.example.com
Saving debug log to /var/log/letsencrypt/letsencrypt.log
Account registered.
Requesting a certificate for mail.example.com

Successfully received certificate.
Certificate is saved at: /etc/letsencrypt/live/mail.example.com/fullchain.pem
Key is saved at:         /etc/letsencrypt/live/mail.example.com/privkey.pem
This certificate expires on 2024-08-04.
These files will be updated when the certificate renews.
Certbot has set up a scheduled task to automatically renew this certificate in the background.

- - - - - - - - - - - - - - - - - - - - - - - - - - - - - - - - - - - - - - - -
If you like Certbot, please consider supporting our work by:
 * Donating to ISRG / Let's Encrypt:   https://letsencrypt.org/donate
 * Donating to EFF:                    https://eff.org/donate-le
- - - - - - - - - - - - - - - - - - - - - - - - - - - - - - - - - - - - - - - -
This command will not prompt you to answer any questions. The option –register-unsafely-without-email simply means that we do not share an email address with letsencrypt.org. This email address is only used to send reminders for renewing the certificate.
Let’s create a small script to renew the certificate and restart opensmtpd. Save the following BASH script to /root/renew-letsencrypt.sh:
#!/bin/bash

/usr/bin/certbot certonly --non-interactive --standalone --domain mail.example.com
systemctl restart opensmtpd.service
And make it executable:
chmod 700 /root/renew-letsencrypt.sh
In order to automatically renew the certificate, we can create a cronjob like so:
crontab -e
no crontab for root - using an empty one

Select an editor.  To change later, run 'select-editor'.
  1. /bin/nano        <---- easiest
  2. /usr/bin/vim.basic
  3. /usr/bin/vim.tiny
  4. /bin/ed

Choose 1-4 [1]:
# JUST PRESS ENTER TO CHOOSE THE nano EDITOR
Enter the following line at the bottom of the file:
0 0 1 * * /root/renew-letsencrypt.shBy default crontab -e opens the nano editor. You can save the changes to the crontab file by pressing CRTL + o and then ENTER. To close the editor and apply the new crontab file, press CRTL + x.
This will renew the certificate automatically at 00:00am at the first of every month and then restart OpenSMTPD to use the renewed certificate.
Now that we have everything in place, it is time to configure OpenSMTPD, the mailserver that will receive throwaway emails for account signups on our Linux server.
Copy paste the following configuration to /etc/smtpd.conf and make sure to:
replace all occurances of example.com with your domain
replace eth0 with your primary network interface (run
ip address show
to find out)
# Do not accept emails larger than 1MB
smtp max-message-size 1M


# Use Letsencrypt certificates for incoming emails with TLS encrypted SMTP connections
pki mail.example.com cert "/etc/letsencrypt/live/mail.example.com/fullchain.pem"
pki mail.example.com key "/etc/letsencrypt/live/mail.example.com/privkey.pem"
# Automatically generate dhparams in the correct length
# Manual: https://man.openbsd.org/smtpd.conf#pki~5
pki mail.example.com dhe auto


# OpenSMTPD uses "tables" to look up defined email addresses
table usermap "/etc/smtpd/tables/usermap"
table recipients "/etc/smtpd/tables/recipients"


# The following filters help to fight incoming SPAM emails
# Block connections from dynaimc DNS providers and from DSL
filter check_dyndns \
    phase connect \
    match rdns regex { '.*\.dyn\..*', '.*\.dsl\..*' } \
    disconnect "560 No residential connections"

# Check the Forward-Confirmed Reverse DNS
# (Check that an IPs forward DNS resolves to a domain and that the domains reverse DNS resolves back to the original IP)
filter check_fcrdns \
    phase connect \
    match !fcrdns \
    disconnect "561 No FCrDNS"

# Check the PTR (reverse DNS) record of the sending domain
filter check_rdns \
    phase connect \
    match !rdns \
    disconnect "562 No rDNS"

# Check that the receiving user exists on this server
filter check_user_exists \
    phase rcpt-to \
    match !rcpt-to <recipients> \
    disconnect "567 User not local or invalid address – relay denied"

# Check Rspamd
filter rspamd \
    proc-exec \
    "filter-rspamd"

# Chain all filters for incoming mails
filter incoming chain { \
    check_dyndns, \
    check_fcrdns, \
    check_rdns, \
    check_user_exists, \
    rspamd \
}


# Listen on eth0
#     pki: Use the Letsencrypt certificate
#     tls: enforce TLS encryption (enforce STARTTLS)
#     hostname: set the hostname to mail.example.com
#     no-dsn: Disable the DSN (Delivery Status Notification) extension
#     filter: apply the incoming chain filters defined above
listen on eth0 \
    port 25 \
    pki mail.example.com \
    tls \
    hostname mail.example.com \
    no-dsn \
    filter incoming


# Define an action called "receive", which uses the "maildir" format to store all received emails below /home/tempmail/Mail
# Maildir format: https://en.wikipedia.org/wiki/Maildir
action receive maildir "/home/tempmail/Mail" virtual <usermap>


# Match all incoming emails (from any) for all recipients defined in the table "recipients" and apply the action "receive" defined above
match \
    from any \
    for rcpt-to <recipients> \
    action receive
The attentive reader might have noticed the table recipients "/etc/smtpd/tables/recipients" as well as the table usermap "/etc/smtpd/tables/usermap" definitions above. These files contain the list of email addresses that the server is configured to accept emails for, as well as for which local Linux user to deliver them to.
OpenSMTPD does not like it if these tables is empty, and if the files have no content yet it will fail with the following error:
/etc/smtpd.conf:80: table "recipients" may not be used for lookups
warn: no rules, nothing to do
opensmtpd.service: Control process exited, code=exited, status=1/FAILURE
Because of this, we have to create one exemplary email address that we can remove later.
mkdir -p /etc/smtpd/tables/
echo john.doe@example.com >> /etc/smtpd/tables/recipients
echo john.doe@example.com tempmail >> /etc/smtpd/tables/usermap
We can now restart OpenSMTPD and verify that it is configured correctly:
systemctl restart opensmtpd.service
systemctl status opensmtpd.service
● opensmtpd.service - OpenSMTPD SMTP server
     Loaded: loaded (/usr/lib/systemd/system/opensmtpd.service; enabled; preset: enabled)
     Active: active (running) since Mon 2024-05-06 21:58:19 CEST; 1s ago
       Docs: man:smtpd(8)
    Process: 5175 ExecStart=/usr/sbin/smtpd (code=exited, status=0/SUCCESS)
   Main PID: 5176 (smtpd)
      Tasks: 12 (limit: 2219)
     Memory: 15.2M (peak: 15.4M)
        CPU: 100ms
     CGroup: /system.slice/opensmtpd.service
             ├─5176 /usr/sbin/smtpd
             ├─5177 "smtpd: crypto"
             ├─5178 "smtpd: control"
             ├─5180 "smtpd: lookup"
             ├─5181 "smtpd: dispatcher"
             ├─5182 "smtpd: queue"
             ├─5183 "smtpd: scheduler"
             ├─5184 /usr/sbin/smtpd
             └─5186 /usr/libexec/opensmtpd/filter-rspamd

May 06 21:58:19 mail.example.com systemd[1]: Starting opensmtpd.service - OpenSMTPD SMTP server...
May 06 21:58:19 mail.example.com smtpd[5175]: info: OpenSMTPD 7.4.0-portable starting
May 06 21:58:19 mail.example.com systemd[1]: Started opensmtpd.service - OpenSMTPD SMTP server.
May 06 21:58:19 mail.example.com smtpd[5180]: rspamd: 2024/05/06 21:58:19 reading line scanner
May 06 21:58:19 mail.example.com smtpd[5180]: rspamd: 2024/05/06 21:58:19 reading lines until ready
May 06 21:58:19 mail.example.com smtpd[5180]: rspamd: 2024/05/06 21:58:19 responding desired filters
Now OpenSMTPD is configured correctly and ready to accept emails. However there are no email addresses configured yet for which it would accept emails. The next section describes how to automatically generate email addresses. If you want to use custom ones, just write them into /etc/smtpd/tables/recipients and issue systemctl restart opensmtpd.service after.
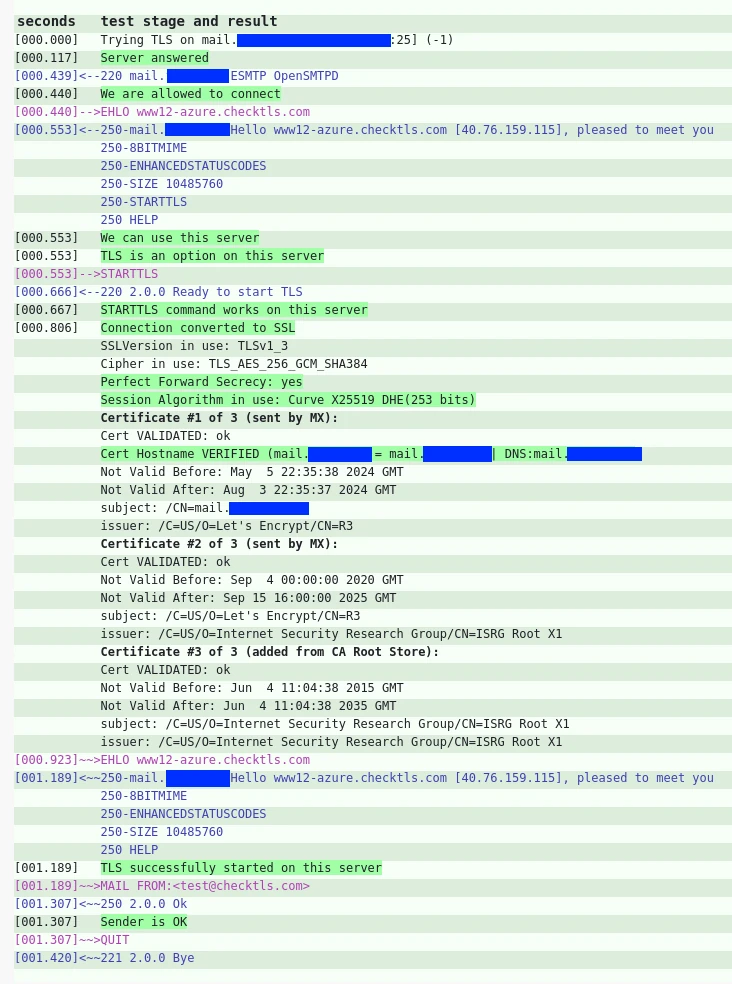
You should make sure that emails can be properly delivered with STARTTLS based SSL encryption. You can use the website checktls.com to test if your OpenSMTPD can encrypt emails using STARTTLS correctly. Simply enter “mail.example.com” on the website and press ENTER. After the check is completed, a successful check result should look like this:
As we want to use these email addresses temporarily and only to receive emails, creating addresses that look real and contain random names seems the best approach. Here is a small BASH script do that. The script will query the website pseudorandom.name
for random names and create email addresses from that. Save the following script to /root/burnmail.sh . Do not forget to adjust the value of “mydomain” at the beginning of the script. Do not set this to mail.example.com, but to example.com.
#!/bin/bash
#
# Create temporary disposable email addresses and configure them in OpenSMTPD

mydomain=example.com


case "$1" in

    "c" )
        random_name="$(curl -s https://www.pseudorandom.name/ | sed 's/ /./g' | tr '[:upper:]' '[:lower:]')"
        email="${random_name}@${mydomain}"
        echo "Creating burnmail account: $email"
        echo "$email" >> /etc/smtpd/tables/recipients
        echo "$email tempmail" >> /etc/smtpd/tables/usermap
        systemctl restart opensmtpd.service
        shift;;

    "r" )
        if test -z "$2"; then
            echo "ERROR: Give email address to remove as second argument!"
            echo "Example: $0 r john.doe@example.com"
            exit 1
        fi
        sed -i "/$2/d" /etc/smtpd/tables/recipients
        sed -i "/$2/d" /etc/smtpd/tables/usermap
        systemctl restart opensmtpd.service
        shift;;

    "s" )
        grep "$mydomain" /etc/smtpd/tables/recipients
        shift;;

    * )
        echo "create:   $0 c"
        echo "remove:   $0 r john.doe@example.com"
        echo "show all: $0 s"
        shift;;

esac
And make the script executable:
chmod 700 /root/burnmail.sh
Here are some examples for using the script.
Showing all existing email accounts:
./burnmail.sh s
clarence.bolder@example.com
Creating a new email account:
./burnmail.sh c
george.fisher@example.com
Removing an email account:
./burnmail.sh s
clarence.bolder@example.com
george.fisher@example.com

./burnmail.sh r george.fisher@example.com

./burnmail.sh s
clarence.bolder@example.com
We will use the command line email client neomutt , a fork of mutt, to view incoming emails directly on the server. In order to view html emails, neomutt needs a bit of configuration. For this simply copy paste the following commands:
mkdir -p /home/tempmail/.config/neomutt

cat << 'EOF' > /home/tempmail/.config/neomutt/config
set mailcap_path = "~/.config/neomutt/mailcap"
auto_view text/html
alternative_order text/plain text/enriched text/html
EOF

cat << 'EOF' > /home/tempmail/.config/neomutt/config/mailcap
text/html; w3m -v -F -o display_link_number=1 -T text/html %s; edit=nano; compose=nano; nametemplate=%s.html; copiousoutput; needsterminal
EOF

cat << 'EOF' > /home/tempmail/.config/neomutt/config/neomuttrc
source ~/.config/neomutt/config
EOF

chown -R tempmail:tempmail /home/tempmail/.config/neomutt
Finally we create a .bash_profile configuration file that automatically opens neomutt when you login as the tempmail user. To exit neomutt, simply press “q”.
echo '/usr/bin/neomutt -f /home/tempmail/Mail/' > /home/tempmail/.bash_profile
chown tempmail:tempmail /home/tempmail/.bash_profile
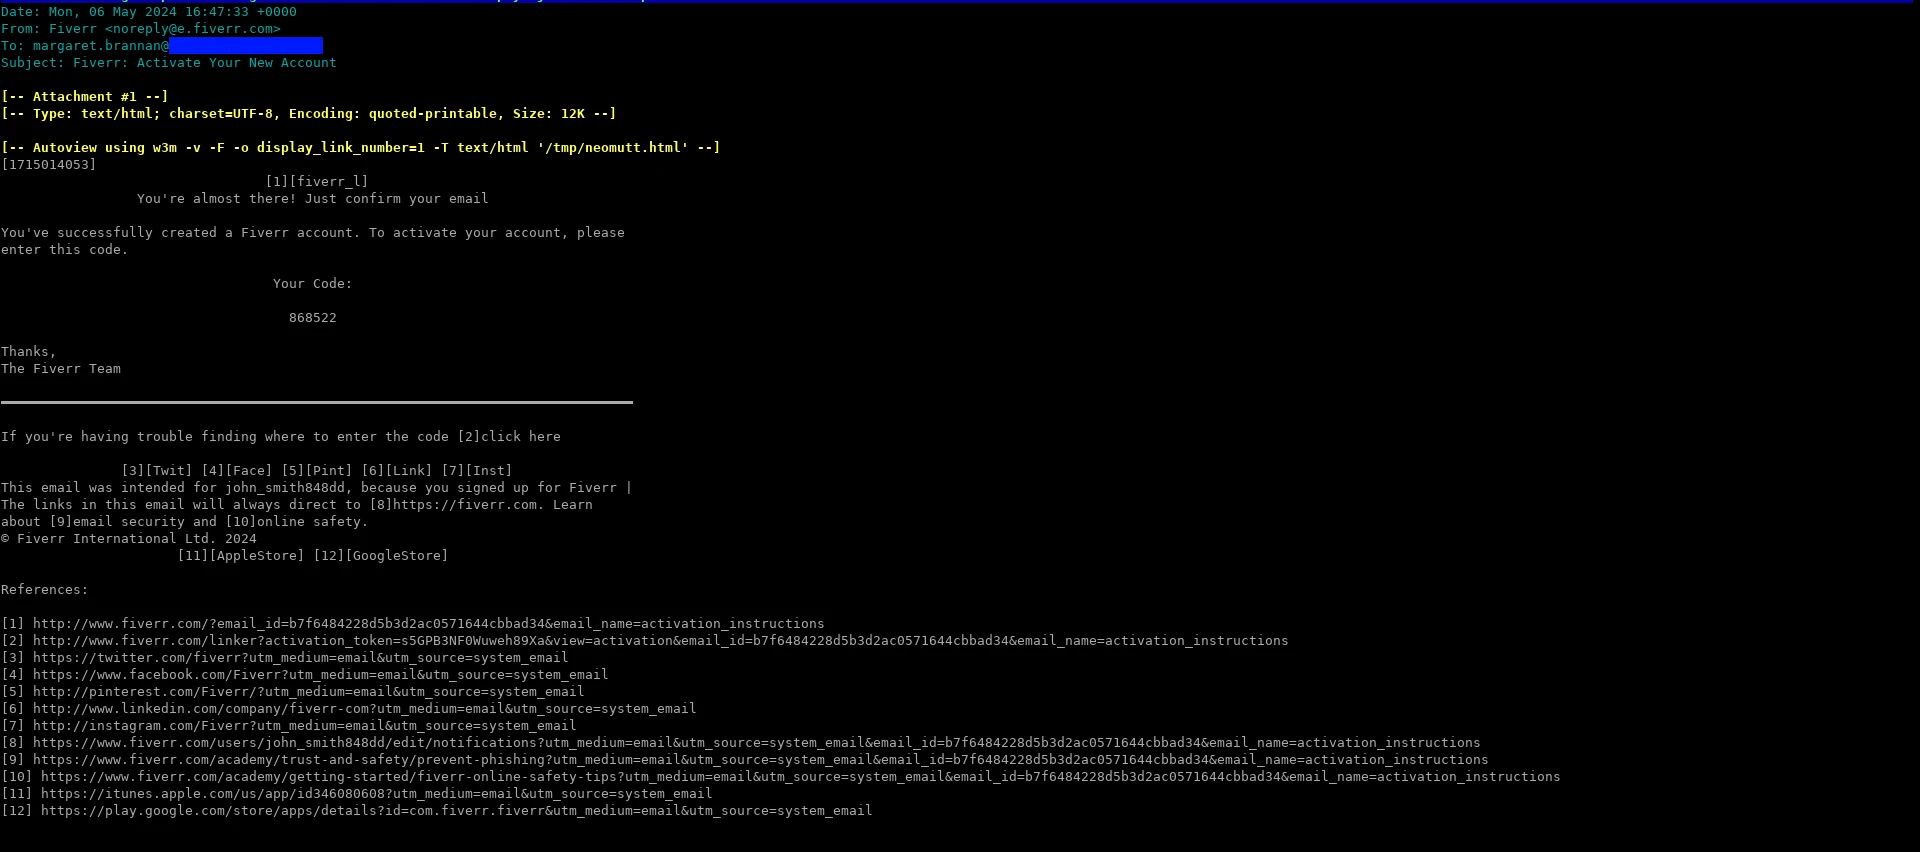
If you now try to login via SSH as the tempmail user, neomutt should immediately open. Viewing a HTML formatted email in neomutt looks like this. As you can see, each link has a [number] next to it, and the links are at the bottom of the view. You can copy paste the links from there.
Here are the basic keybinds you will need for neomutt:
quit neomutt: q
select emails: arrow up or k, arrow down or j
view an email: ENTER
exit email view: q
For additional information refer to the neomutt documentation .
To test the new installation follow these steps:
Login as root and generate a new burnmail address:
./burnmail.sh c
Login via
ssh tempmail@mail.example.com
to view emails with neomutt
Choose a website that has email based signup and create an account using the disposable email address
Wait for the mail to arrive, view the mail with neomutt and copy the link for completing the signup
If the mail does not arrive check the logs as described below.
Run the following command before sending test emails to the new throwaway email addresses you created. This way you can see the logfiles OpenSMTPD creates while it processes the new email.
The output is what an email looks like that is successfullly delivered and saved in /home/user/tempmail:
journalctl -u opensmtpd -f
May 06 20:21:21 mail.fllm.net smtpd[3920]: f274cf34b7d0786b smtp connected address=85.215.236.191 host=mail.blunix.com
May 06 20:21:21 mail.fllm.net smtpd[3920]: f274cf34b7d0786b smtp tls ciphers=TLSv1.3:TLS_AES_256_GCM_SHA384:256
May 06 20:21:22 mail.fllm.net smtpd[3920]: f274cf34b7d0786b smtp message msgid=78e5c402 size=1118 nrcpt=1 proto=ESMTP
May 06 20:21:22 mail.fllm.net smtpd[3920]: f274cf34b7d0786b smtp envelope evpid=78e5c402920bcc4f from=<info@blunix.com> to=<clarence.manning@example.com>
May 06 20:21:22 mail.fllm.net smtpd[3920]: f274cf35d39a7d0b mda delivery evpid=78e5c402920bcc4f from=<info@blunix.com> to=<clarence.manning@example.com> rcpt=<clarence.manning@example.com> user=tempmail delay=1s result=Ok stat=Delivered
Are you looking for
Linux Consulting for Projects,
Linux Managed Hosting,
Qubes OS Consulting and Support or
Linux Trainings and Workshops?